|
-
13th February 07, 01:36 AM
#1
OI! Dreadbelly! hose knitting pattern.
Last edited by Warlock; 13th February 07 at 01:50 AM.
-
-
13th February 07, 01:41 AM
#2
No it doesn't ,or at least I can't get it to work
-
-
13th February 07, 01:54 AM
#3
-
-
13th February 07, 01:57 AM
#4
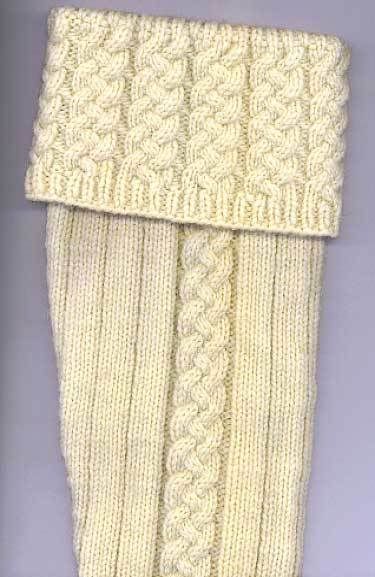
I found a different way of working toe-up in an old issue of Knitter's Magazine. The method was explained by Joan Schrouder. The heel turning is worked just the same as in the top-down method. The heel flap and short-row turning is worked on the sole stitches. The turned part of the heel will be on the back of the heel, not under it. There are no gusset increases made in approaching the heel as with some recipes, and yet there is a gusset for a nice fit over the instep. In Schrouder's original recipe, the gusset decreases slant out toward the sides and closely resemble gussets knitted top-down. In my adaptation, the decreases slant toward the center and work elegantly with the Celtic braids down both sides of the leg, giving a solid vertical look. The cables on the sides of the legs are lower down, closer to the sole than is seen on most top-down hose.
I have always loved Celtic art, motifs, braids and knotwork. I know that Aran is an Irish island and that "Aran knitting" is a 20th century invention. I know that Robert Burns and "John Anderson" lived in the 18th century. But to me, the braids and cables of the knitting known as "Aran knitting" nevertheless evoke the mystical and romantic spirit of Scotland of centuries past. They seem perfectly at home on kilt hose.
On Size and Gauge.
I highly recommend knitting on one or two circular needles. It is a lot easier and less "fiddly" than double-points. Socks, stockings, hose, and sleeves are can be easily slipped on with the stitches on the flexible cables, making fittings a snap, doing away with a lot of guesswork. Suit yourself. If you do use dps, I suggest you put the sts on four of them and knit with a fifth. With your sts on five needles, there is less stress at the point between needles and your hose are less likely to have gaps where you change needles.
I used a generic "worsted weight" wool knitted on two 24" 2.5mm needles for a
gauge of 7 sts per inch over stockinet. Before they are washed they will be
fairly stiff
The pattern is formulated for a 10" (25cm) foot with a base circumference of 9" (22.5cm). The patterning at the leg-foot joining is figured on an exact st count of 62, so that the braid pattern and the ribbing on the foot flow smoothly into the leg ribbing. If you need a smaller or larger size, vary the yarn and needles you use to adjust the circumference. A little figuring and experimenting should take care of most leg and foot sizes. When in doubt, swatch it out! The foot and leg can be easily lengthened by working more or fewer rounds; the foot by adding or subtracting rounds between the toe and the start of the heel, and the leg, above the heel before the calf shaping, before the ribbed "garter" area, or in the garter area itself. After you've made a pair, you can alter the st counts into the pattern, knowing how it all works at the gusset juncture.
The experienced sock knitter can easily adapt this pattern to the traditional top-down method with the usual heel and gusset treatment.Also, by eliminating the ribs from the pattern,stitch counts can be changed, and there isn't any fuss over having to do complex figuring to get the foot ribs to merge "seamlessly" with the leg ribbing.
According to the Scottish Order of Dress (Military regulations), kilt hose are to be worn 8cm (3.2") below the kneecap. A general rule of thumb says that "three fingers" below the kneecap is close enough. No mention is made as to what is or isn't worn under the kilt....
Notes:
1) Make YO by taking the yarn to the opposite side and working the next stitch.
For knit rows, yarn is to front, for purl rows the yarn is at the back.
2) SSP, SSSP: (Slip, slip, purl) (Slip, slip, slip, purl.) Slip the sts,
one at a time, as if to knit, to the right needle. Replace sts on left needle
and purl them together through the back, inserting the right needle through
all sts from left to right on the back of the work.
3) To "correct" the mount of the right side sts: insert the right needle into
the stitch from the back, slipping it onto the right needle, repeat as needed,
then slip the st(s) back to the left needle.
The Braid Pattern.
FC4: Front cross. Slip 2 sts to cable needle and hold at front of work,
K next 2 sts, K2 from cable needle.
BC4: Back cross. Slip 2 sts to cable needle, hold at back, K next 2 sts, K2
sts from cable needle.
The Pattern.
With waste yarn, cast on 31 sts.
Row 1: Purl 1 row.
Row 2: Sl 1, knit 29. Turn
Row 3: YO, purl 29. Turn.
Row 4: YO, K 28. Turn
Row 5: YO, P 27. Turn
Row 6: YO, K 26. Turn
Row 7:YO, P 25. Turn
Continue as established, working one less st each side until purl row is
worked YO, P11. Turn.
Row 1: YO, K 11, correct mount of next st, K2tog. Turn. (The corrected st is
a YO.)
Row 2: YO, P 12, SSP. Turn.
Row 3: YO, K 13, correct mount on next 2 sts, K3tog. (The 2 corrected sts
are YOs.)
Row 4: YO, P 14, SSSP. Turn.
Row 5: YO, K 15, correct 2 sts, K3tog. Turn.
Continue as established, working 1 more st each side, correcting the st
mounts,until last right side row ends K32, K3tog. Turn.
Next row. Slip 1, Purl 29, SSSP. Turn.
Next row: Sl1, Knit 30.
Pick up the sts of the cast on edge by knitting up the yarn between the loops
of waste yarn. Depending on your cast-on method, you will probably need to
pick up one or two sts to make the total come to 62. Pick up any needed sts
at the sides of the toe.
Begin instep pattern.
(P1, K4) 6 times, P1, K 31.
Repeat this round until piece measures 7" (or desired length minus 2.5 to 3")
from the tip.
Work heel flap. Knit in stockinet the 31 sts of the sole only. You can knit them plain, add a reinforcing thread,or begin working "Eye of the Partridge" stitch*** with the center st, increasing it by one st on each side on every right side row, through the heel turning. If you are knitting a firm fabric, you can do without the reinforcement. You can always go back and apply a reinforcement by weaving in another yarn on the WS if you change your mind. Continue heel flap for 32 rows. Sole should measure 10" , ending with a purl row.
Turn the heel.
Row 1: Knit 18, K2tog, K1. Turn.
Row 2: Sl1, P6, P2tog, P1. Turn.
Row 3: Sl1, K7, K2tog, K1. Turn.
Row 4: Sl1, P8, P2tog, P1. Turn.
Continue as established, working one more st each row, until all sts are
worked in. End with purl row. 19 sts.
Knit across heel sts. (Cease heel st or drop reinforcement if you are using
it.)
Pick up 16 sts along edge of flap, continue in pattern across 31 instep sts, pick up 16 sts along edge of flap. 82 sts. In order to prevent a hole where the flap meets the instep, pick up an extra st in the corner. You will need to decrease it on the next round to return the total to 82 sts. Knit 8 of the heel sts to end the round.
Begin leg pattern:
Heel sts are now divided between two needles.
Set-up round: (P1, K4)2x, P2, K8, P2, K1, place marker, K3, P1,(K4,P1)6x, K3,
place marker, K1, P2, K8, P2, K4, P1, K4.
Round 2: (P1, K4)2x, P2, K8, P2, K1, slip marker, SSK, K1, P1 (K4, P1)6x,
K1, K2tog, slip marker, K1, P2, K8, P2, K4, P1, K2.
Round 3: Work sts as they present themselves, K the K sts, P the P sts, slip
markers.
Round 4: (P1, K4)2x, P2, K2, FC4, K2, P2, K1, SSK, P1, (K4, P1)6x, K2tog, K1,
P2, K2, FC4, K2, P2, K4, P1, K4.
Round 5: Work sts as presented, slipping markers.
Round 6: Work sts as presented, decreasing at gussets, after 1st marker and before 2nd marker as established on each side.
-
-
13th February 07, 01:58 AM
#5
part 2
Round 7: (P1, K4)2x, P2, (BC4)2x, work instep sts as presented to next braid,
(BC4)2x, P2, K4, P2, K4.
Round 8: Work all sts as presented, decreasing at markers.
Round 9: Work even.
Round 10: Work around as established, working K2, FC4, K2 over braids.
Continue in established pattern, working the decreases on even rounds, and twisting the braids every third round, until 10 decreases have been worked on each side. 62 sts.
Work as established until piece measures 5.5" -6" above sole.
Begin calf shaping.
Purl 1 st. Increase 1 st by picking up the strand between the sts and knitting it through the back, continuing around and increasing after the last st. {This can alternatively be done by purling twice in the seam st and knitting twice in the last.} Work these sts into the pattern on the following round as purl sts.
Work 5 rounds as established.
Work increase round adding the new sts as K sts on both sides of the purl
seam st.
Continue with braid pattern and increases every 6th round, working sts into the 4/1 rib pattern, until there are 8 knit panels in the rear section, back of the braids. On the next increase round, change the P seam st to K and increase 1 st on each side as before. These will be P sts. At the next increase, work the added sts as K sts on either side of the center K st, and on the final inc, work the last incs outside the central three K sts. There will now be a central 5 st knit panel centered on the back of the leg. Work evenly on 88 sts until leg measures about 14" or desired length from sole. (Remember the 3-fingers rule.) End when braid pattern is 2 rounds after a twist round if possible.
Turn work inside out. We are going to be knitting back the other way round.
Wrap the yarn around the last st on the right needle. Knit up this wrap when
you get to it at the end of the next round.
Begin the garter ribbing.
This section is knitted on fewer sts, forming a tighter area that helps the hose stay up.
Begin K1, P1 ribbing, decreasing 18 sts evenly around. 70 sts.
Rib for about 2.5" (20 rounds). Knit one round for turning ridge, at the same time increasing 10 sts evenly, for a total of 80. Rib 4 rounds.
Knit 1 round, increasing 30 sts evenly, for a total of 110 sts.
Begin turn-over pattern.
Round 1: (P2, K8) 11x.
Round 2: As round 1.
Round 3: *P2, K2, FC4,K2 * around.
Rounds 4 and 5: As round 1.
Round 6: *P2,(BC4)2x * around.
Repeat these 6 rounds 4 more times. Repeat round 1.
Begin K1, P1 rib, decreasing 30 sts evenly across first round. 80 sts.
Rib 2 rounds more.
Bind off loosely in ribbing, using a needle 1 or 2 sizes larger.
Repeat from beginning. :-)
Happy Knitting.
Robert.
PS: *** The "Eye of the Partridge" heel stitch is worked similarly to the regular Sl1, K1 heel stitch, but varies in that the slipped sts of the present RS row are the ones that were knitted on the last RS row. It produces a subtle "watermark" kind of look. In this pattern though, the reinforced area starts with a single centered slipped sts and is expanded by one st on each side on every RS row. In other words: (The first st of all rows is slipped.)
Row 1 (RS): K15, Sl1, K15.
Row 2 (WS): Purl.
Row 3: K14, Sl1, K1, Sl1, K14.
Row 4: Purl.
Row 5: K13, Sl1, K1, Sl1, K1, Sl1, K13.
Row 6: Purl.
Row 7: K12, Sl1, K1, Sl1, K1, Sl1,K1, Sl1, K12.
Row 8: Purl.
And so on.
-
-
13th February 07, 02:11 AM
#6
-
-
13th February 07, 09:30 AM
#7
I... Can't knit really.  What knitting I do I usually do on a rake loom. What knitting I do I usually do on a rake loom.
And I can't read patterns. Gobblety gook.
I really need to learn how to knit proper and then see if I can just wing it.
Would it suprise anybody to know what I do all of my crochet work by just eyeball and freehand?  It's freaked a few people out at the craft store that I am pattern impaired. It's freaked a few people out at the craft store that I am pattern impaired.
-
Similar Threads
-
By Warlock in forum DIY Showroom
Replies: 21
Last Post: 10th February 07, 03:51 AM
-
By mbhandy in forum How to Accessorize your Kilt
Replies: 10
Last Post: 8th January 07, 09:57 AM
-
By MacWage in forum How to Accessorize your Kilt
Replies: 3
Last Post: 27th August 06, 11:49 AM
-
By Socceroskcsdk in forum How to Accessorize your Kilt
Replies: 7
Last Post: 31st May 04, 05:30 AM
 Posting Permissions
- You may not post new threads
- You may not post replies
- You may not post attachments
- You may not edit your posts
-
Forum Rules
|
|


Bookmarks