X Marks the Scot - An on-line community of kilt wearers.

   X Marks Partners - (Go to the Partners Dedicated Forums )
USA Kilts website Celtic Croft website Celtic Corner website Houston Kiltmakers

User Tag List

Results 1 to 9 of 9
  1. #1
    Join Date
    25th September 04
    Location
    Victoria, BC, Canada 1123.6536.5321
    Posts
    4,794
    Mentioned
    3 Post(s)
    Tagged
    0 Thread(s)

    A peek inside a very common Traditional kilt

    As a custom kilt maker I get to see a lot of different kilts.
    I also get to see all the good, bad, and the ugly.
    I am sorry to say that not all kilt makers are the fiber artist of a Barb Tewksbury. Many kilts advertised as premium, Traditional kilts, are not always as they are advertised.

    Earlier this week a new customer came into the shop with a Scottish made kilt that she has had for a number of years.

    She asked me if I could re-size it. She told me that the kilt had been re-sized once before by a lady here in town who once had the reputation as the premier Traditional kilt maker in Victoria but has since retired.

    She also stated that since its last re-size the kilt had not felt the same or fit as well as when it was first purchased.

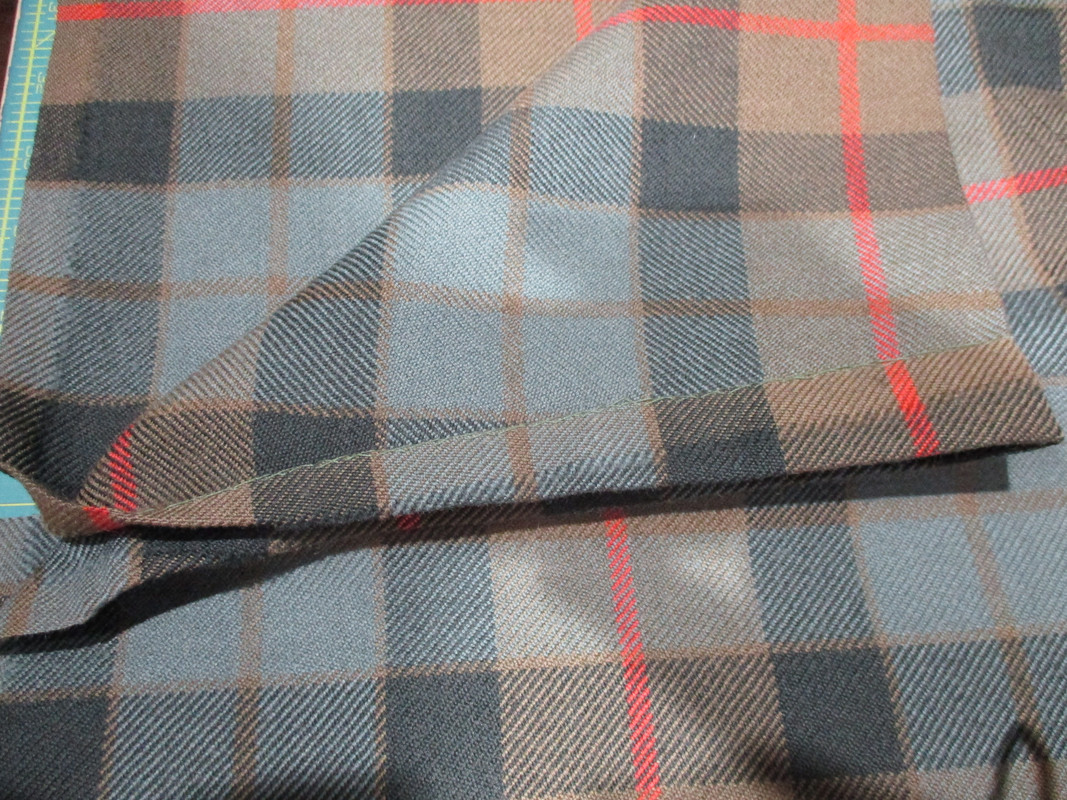
    The fabric was woven by Strathmore in what they call their Scott Brown OC Tartan. 13oz weight.

    We do not know who the original maker was because the makers label was removed when the kilt was last re-sized.

    The very first thing I noticed about this kilt is that while the straps were originally sewn by hand they were re-sewn by machine.


    I also noticed right away that the Fell area of this kilt was very floppy. It did not stand up on its own the way I make a kilt.


    I next did the stretch test. Pulling on the buckles to see if the stress of strapping the kilt on would be transferred to the outer Tartan fabric and the hand stitching.

    This kilt failed the stretch test.


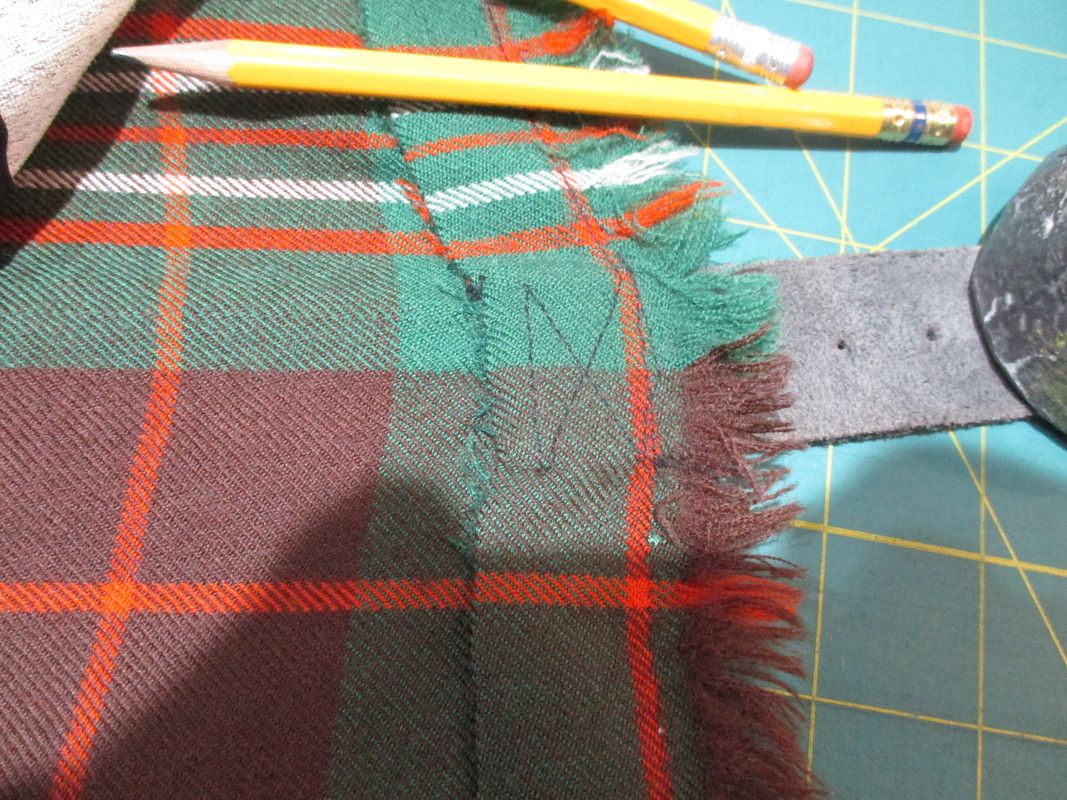
    You can see where the outer Tartan fabric has been stressed enough that the stitching has been pulled and is now showing.


    The customer was very sure that they wanted this kilt to fit and fit well. She was willing to have me disassemble the kilt and fix any problems that I found.

    The first step of this process is to remove the liner inside the kilt to expose the internal construction.


    I'm a stickler to let people know that the liner is not a structural element inside a kilt. It is not to keep the kilt clean. (If it were it would be removable and washable.)
    The liner's only purpose is to cover, and hide, the the structural elements underneath.

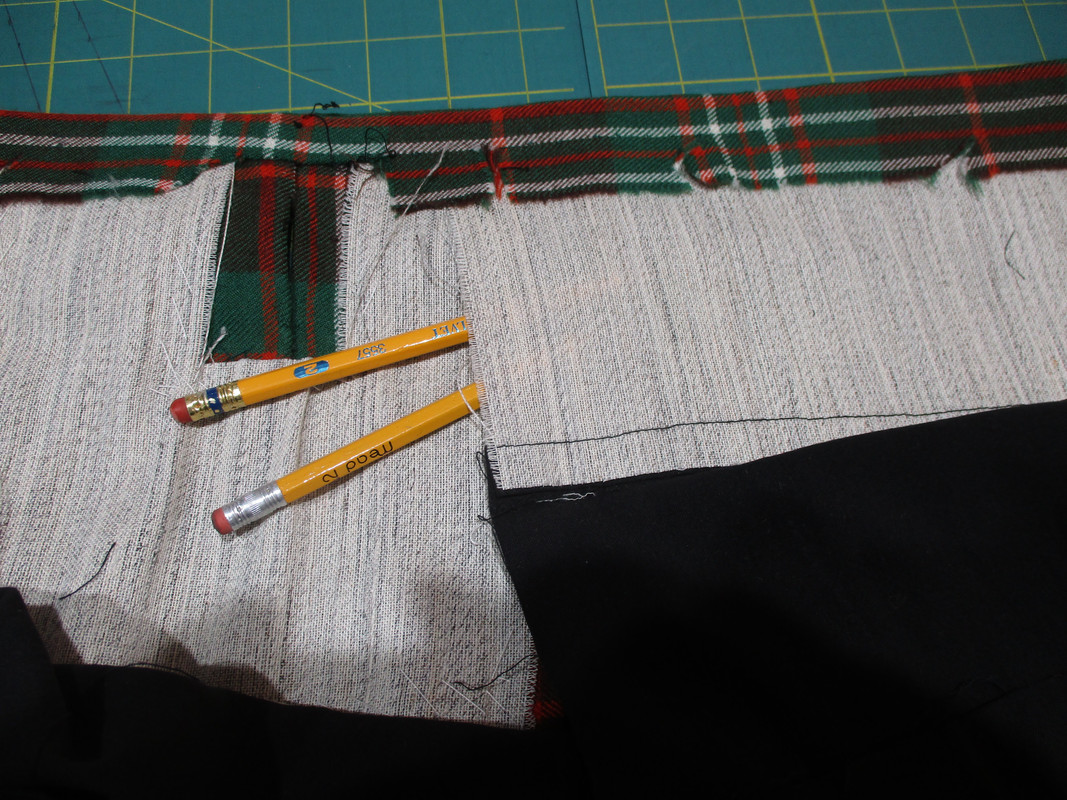
    Notice in the photo just above that there is no stabilizer in this kilt. The purpose of the stabilizer is to give horizontal strength to the garment. The straps and buckles should be anchored through the outer Tartan fabric - to the stabilizer. If you wish you can think of the stabilizer as a belt built inside the garment.

    In this kilt the straps are not anchored to anything other than the apron facings.


    You can easily see the distortion of the Tartan fabric when the straps are not anchored.

    ]

    The light brown stuff in this photo is called hair canvas interfacing.

    In this kilt the piece of apron interfacing is not even sewn to the Fell interfacing.


    The strap and interfacing on the other side are the same.


    Notice please the small strip of fabric added to the waistbanding when this kilt was re-sized. I suspect that this small piece of fabric was taken out of one of the apron facings as no attempt was made to align the Tartan pattern.

    Evidence of this can be found in the apron facings themselves as the stitching of one is significantly different from the stitching of the other.

    I'll continue this thread as the re-build and re-size of this kilt progresses.
    Last edited by Steve Ashton; 8th June 19 at 08:31 AM.
    Steve Ashton
    www.freedomkilts.com
    Skype (webcam enabled) thewizardofbc
    I wear the kilt because:
    Swish + Swagger = Swoon.

  2. The Following 8 Users say 'Aye' to The Wizard of BC For This Useful Post:


  3. #2
    Join Date
    7th February 11
    Location
    London, Canada
    Posts
    9,411
    Mentioned
    1 Post(s)
    Tagged
    0 Thread(s)
    I'm shuddering at this.

    Whoever did the re-size assassination... I know better than that only from reading XMarks over the years. A kilt is not a shirt or pair of pants. It's so very specific.
    Rev'd Father Bill White: Retired Parish Priest & Elementary Headmaster. Lover of God, dogs, most people, joy, tradition, humour & clarity. Legion Padre, theologian, teacher, philosopher, linguist, encourager of hearts & souls & a firm believer in dignity, decency, & duty. A proud Canadian Sinclair.

  4. #3
    Join Date
    25th September 04
    Location
    Victoria, BC, Canada 1123.6536.5321
    Posts
    4,794
    Mentioned
    3 Post(s)
    Tagged
    0 Thread(s)
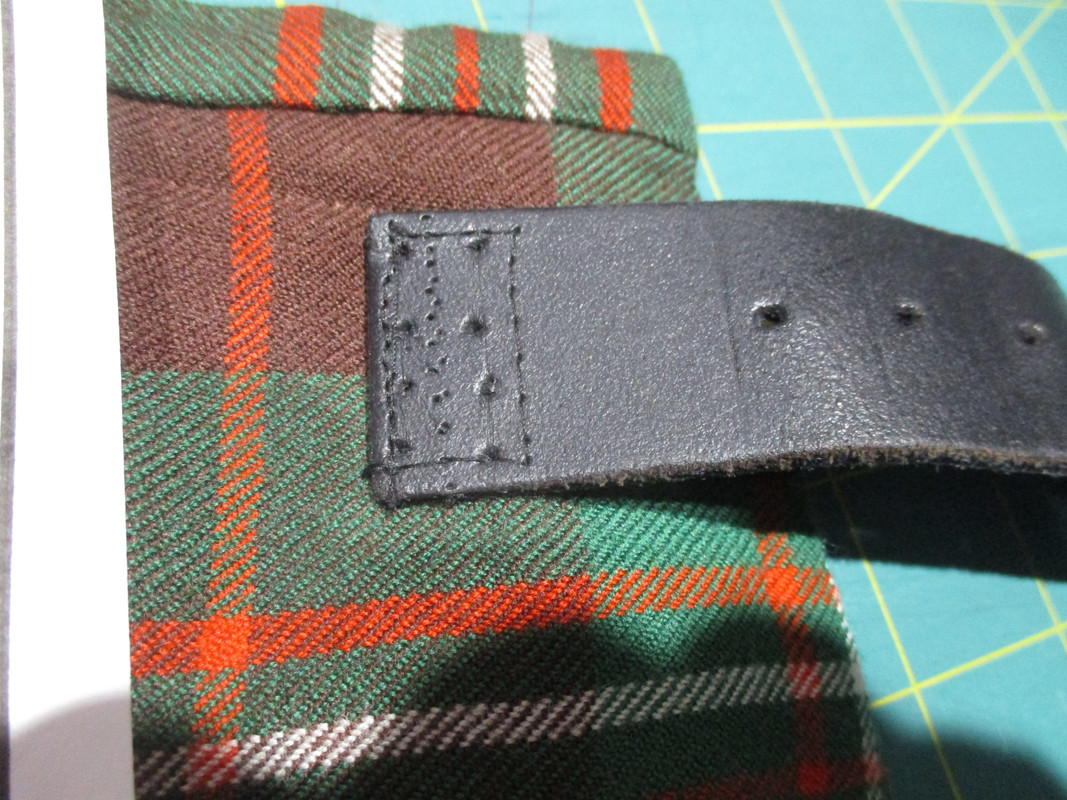
    As I said in my first post the stitching of one apron facing is quite different from the other.


    While the person who re-sized this kilt was supposed to be very well regarded the difference in stitching is quite evident.

    You can see this same style of stitching in other places as well.


    I am not sure why the person did not take the apron tip fold all the way to the edge of the pleat and stitch it more like this. It is such a small thing.


    I guess the old adage is true -

    "A Craftsman is defined as one who will still do the best job they are capable of doing, even in those places where it does not show and where the customer may never see."

    And maybe this is a simply case of all Traditional kilts being equal. Remember that there is no 'standard' or one way to make a kilt.

    The next step is to remove the hair canvas interfacing so I can see the pleats underneath.

    To be continued -
    Last edited by The Wizard of BC; 1st June 19 at 03:55 PM.
    Steve Ashton
    www.freedomkilts.com
    Skype (webcam enabled) thewizardofbc
    I wear the kilt because:
    Swish + Swagger = Swoon.

  5. The Following 3 Users say 'Aye' to The Wizard of BC For This Useful Post:


  6. #4
    Join Date
    27th October 09
    Location
    Kerrville, Texas
    Posts
    5,692
    Mentioned
    8 Post(s)
    Tagged
    0 Thread(s)
    Looks like the same issues as the kilt you rebuilt for me several years ago!

  7. #5
    Join Date
    25th September 04
    Location
    Victoria, BC, Canada 1123.6536.5321
    Posts
    4,794
    Mentioned
    3 Post(s)
    Tagged
    0 Thread(s)
    You are correct Tobus. A very similar situation. The difference is that this kilt had been re-worked at some point in its life.
    We do not know who originally made it. We do not know its original condition.

    But, like yours, this kilt was given to the customer with the assurance that it was built and repaired to the highest Traditional kilt making standards.

    The owner does not know, or understand, and has no way to tell, if what they get is good or bad. They are only going by what they are being told.

    If anyone is interested in what Tobus is referring to, please click here to go to the thread.
    Last edited by The Wizard of BC; 1st June 19 at 04:53 PM.
    Steve Ashton
    www.freedomkilts.com
    Skype (webcam enabled) thewizardofbc
    I wear the kilt because:
    Swish + Swagger = Swoon.

  8. The Following User Says 'Aye' to The Wizard of BC For This Useful Post:


  9. #6
    Join Date
    25th September 04
    Location
    Victoria, BC, Canada 1123.6536.5321
    Posts
    4,794
    Mentioned
    3 Post(s)
    Tagged
    0 Thread(s)
    I had some time today to work on the Scott Brown Anc. kilt re-build.

    Now remember, this is not to single out any one kiltmaker or any one style or school of kiltmaking. Just to give photographic examples showing, that not all kilts advertised as "Traditional", are made the same.

    Any new kilt buyer would do themselves a big favor by knowing what goes into a good kilt and how to identify a quality, well made kilt.

    I highly recommend that any time you look at a kilt that you do the "Stretch Test". Not only across the Fell Area, but across the Aprons too.


    OK, On to continuing the re-build

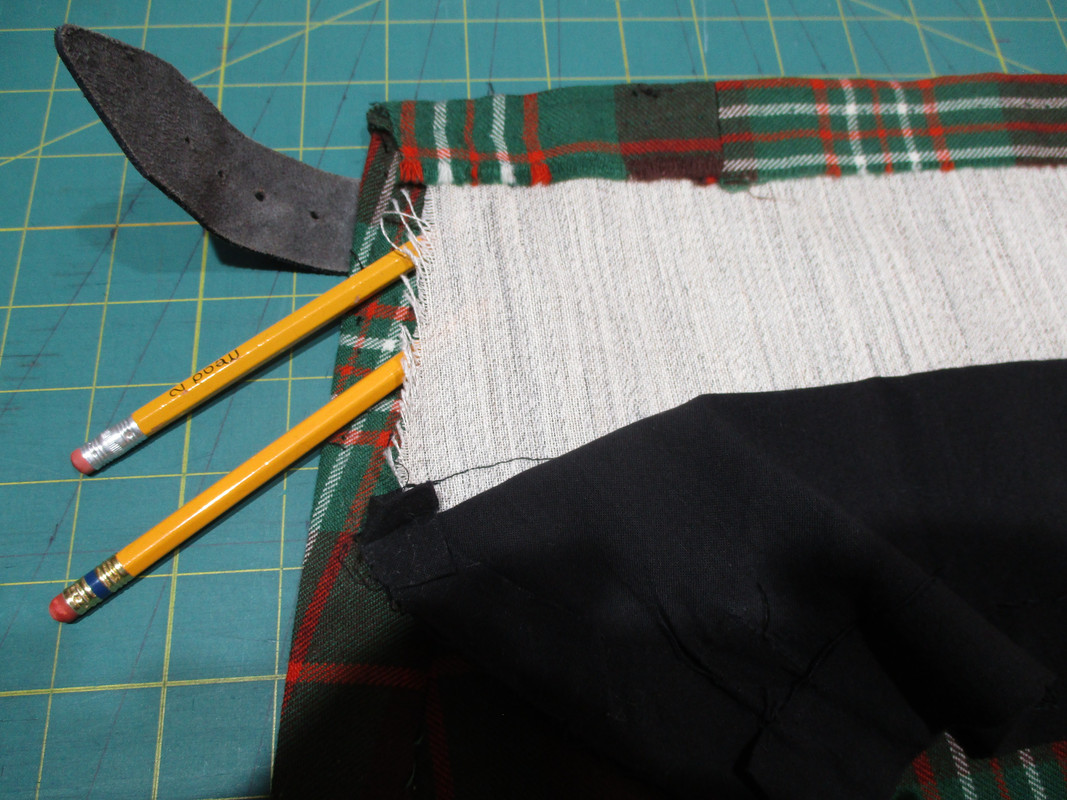
    I got the interfacing out. There is no stabilizer in this kilt at all.

    As you remember, I said that this kilt had been worked on at least once before, so yes, it is possible that the original maker put stabilizer in the kilt and who ever re-built it took it out.
    Perhaps the new person did not know what the stabilizer does so felt it was just something extra.

    But - The stabilizer is the horizontal strength of the entire garment. The outer Tartan fabric is far too supple to support the stress of strapping a kilt on, and the hand stitching is, and unless you are a Barb Tewksbury, not strong enough not to fail over time.

    Think of the stabilizer as a belt built inside the kilt.

    The interfacing is just as important. It allows the outer fabric to drape and hang naturally along with providing the horizontal stiffness to the garment. This is why well made suit coats have interfacing inside.
    It is also the interfacing which allows the outer fabric to have the famous swish. Yes, supple fabric will swish without interfacing but with the heavier weigh, stiffer, fabrics the interfacing increases and enhances the swish.
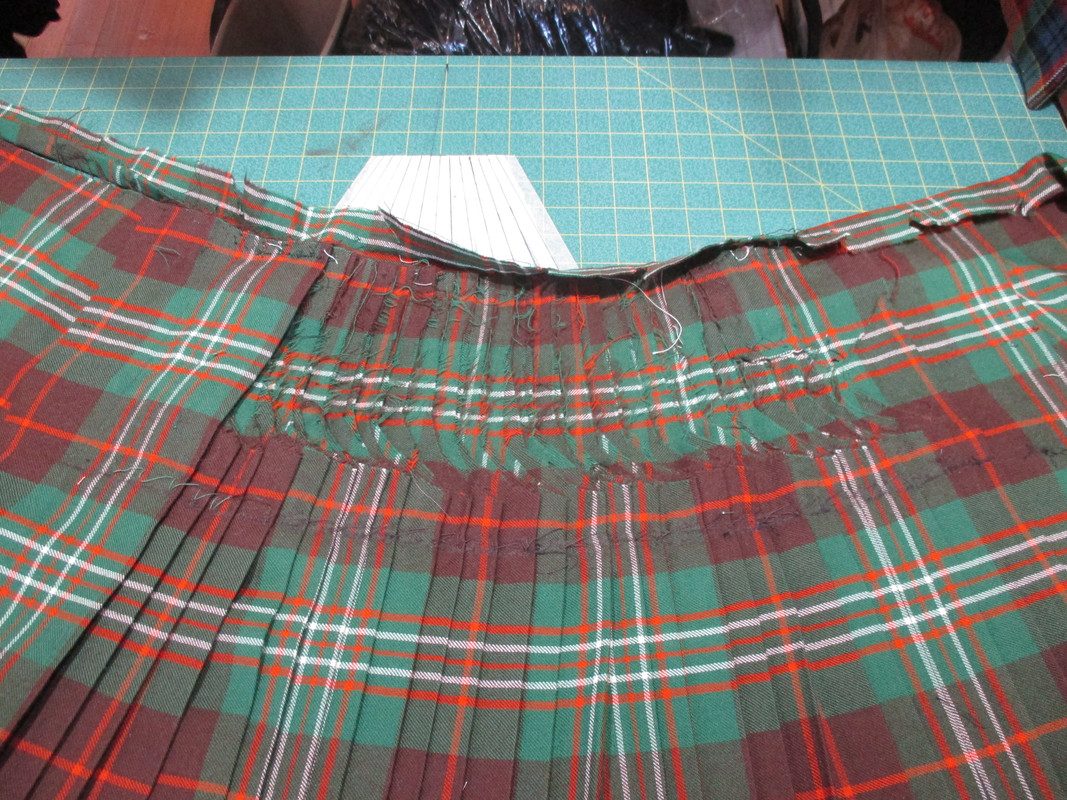


    One thing that surprised me was the interfacing was sewn in with multiple runs of machine stitching under the waistbanding. It took quite a while to unstitch them to get the interfacing out.

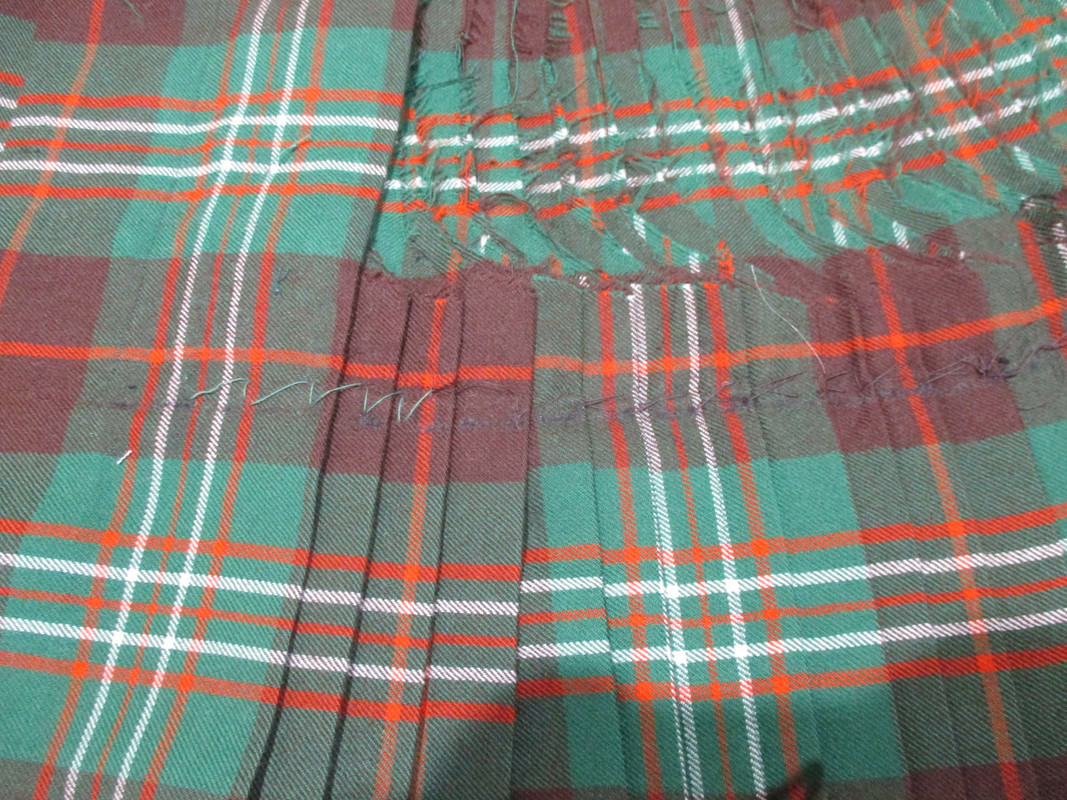
    The next thing that I noticed as that when this kilt was rebuilt, the steeking was done in much the same manner as the under apron facing stitching. A totally different thread was used and a totally different stitch technique.

    While the older stitching is sort of messy it has held up. The new stitching has not.


    Now that the interfacing and liner are out you can see that they are three separate pieces. These were not sewn together so when you do the stretch test across the aprons you see the stretching as the interfacing just "accordions" apart.


    While there is interfacing in this kilt it is only one single layer. Instead of folding the interfacing to take the compound curve in the Fell, the single piece is cut like darts. These were sewn together loosely but the stitching had come undone and failed. The stitching of the interfacing should also be anchored to the Tartan fabric to keep it from moving and balling up when the garment is washed. This interfacing was just loosely stitched catching the outer fabric in only 5 or 6 places.

    And as I suspected the buckles and straps are sewn only to the outer Tartan fabric. A kilt can have the best interfacing and stabilizer in the world, but if you do not anchor the straps and buckles to that interfacing and stabilizer - Well then, why even put it in there in the first place.

    I would say that this re-built kilt was built in the casual style now. The type of kilt where the stabilizer and interfacing are not used. All the stress of strapping the kilt on must be taken by the outer fabric and the stitching. I have knicknamed this school of kiltmaking "Jeans Made" vs "Kilt Made".


    With the interfacing of this kilt completely removed I can turn the kilt over and see that the buckles are still attached to the outside.


    If you do the stretch test now the effect is exactly the same as on the kilt when it arrived.

    So the next step is to remove the straps and buckles along with everything else. They had to come off anyway as part of this re-build job is to re-size the kilt.
    Last edited by The Wizard of BC; 4th June 19 at 04:10 PM.
    Steve Ashton
    www.freedomkilts.com
    Skype (webcam enabled) thewizardofbc
    I wear the kilt because:
    Swish + Swagger = Swoon.

  10. The Following 10 Users say 'Aye' to The Wizard of BC For This Useful Post:


  11. #7
    Join Date
    25th September 04
    Location
    Victoria, BC, Canada 1123.6536.5321
    Posts
    4,794
    Mentioned
    3 Post(s)
    Tagged
    0 Thread(s)
    Many of you know that I have a very difficult time with how the word "traditional" is used. I have seen so many different ways to make kilts that I honestly do not believe any one is more traditional than another.

    As the kilt I am working on may have been 'traditional' at one time it now does not fit into the same catagory as a kilt made in accordance with TAoK. So I do not feel that I am breaking some sort of rule by re-building this more in the Contemporary style.

    This means that the next thing I did was to close up the left strap hole. To me, this is building in a weak point into the garment.

    I then constructed a Contemporary style stabilizer and interfacing.


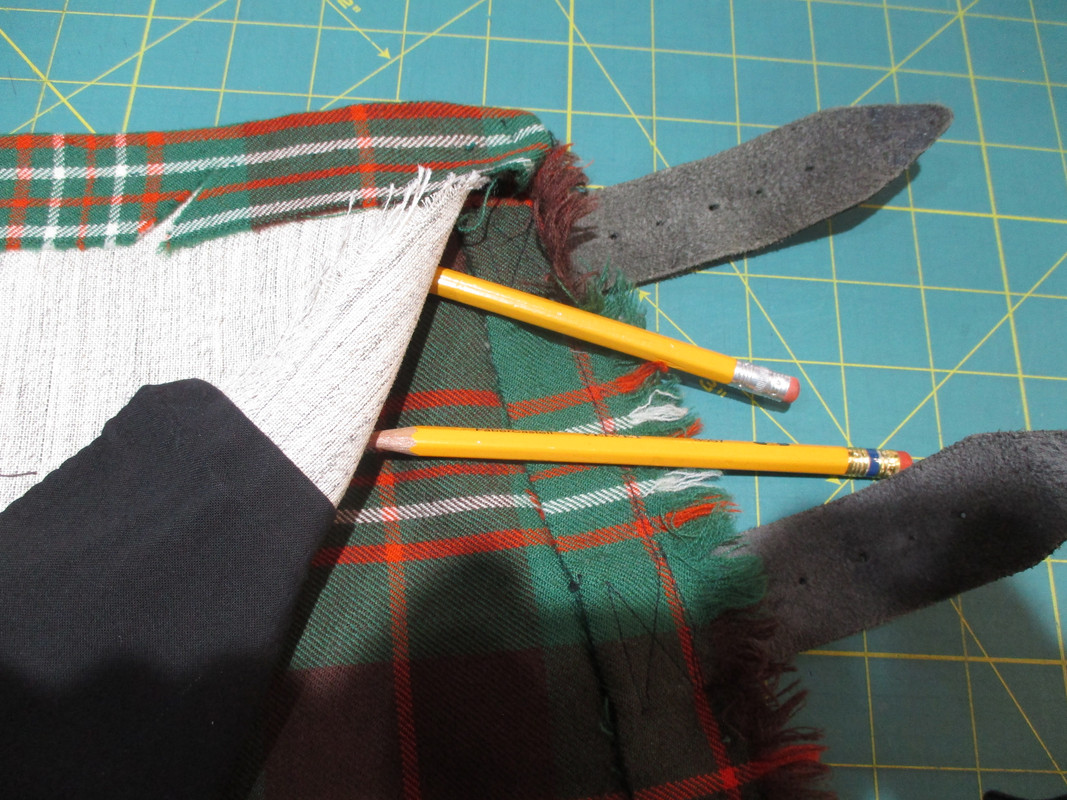
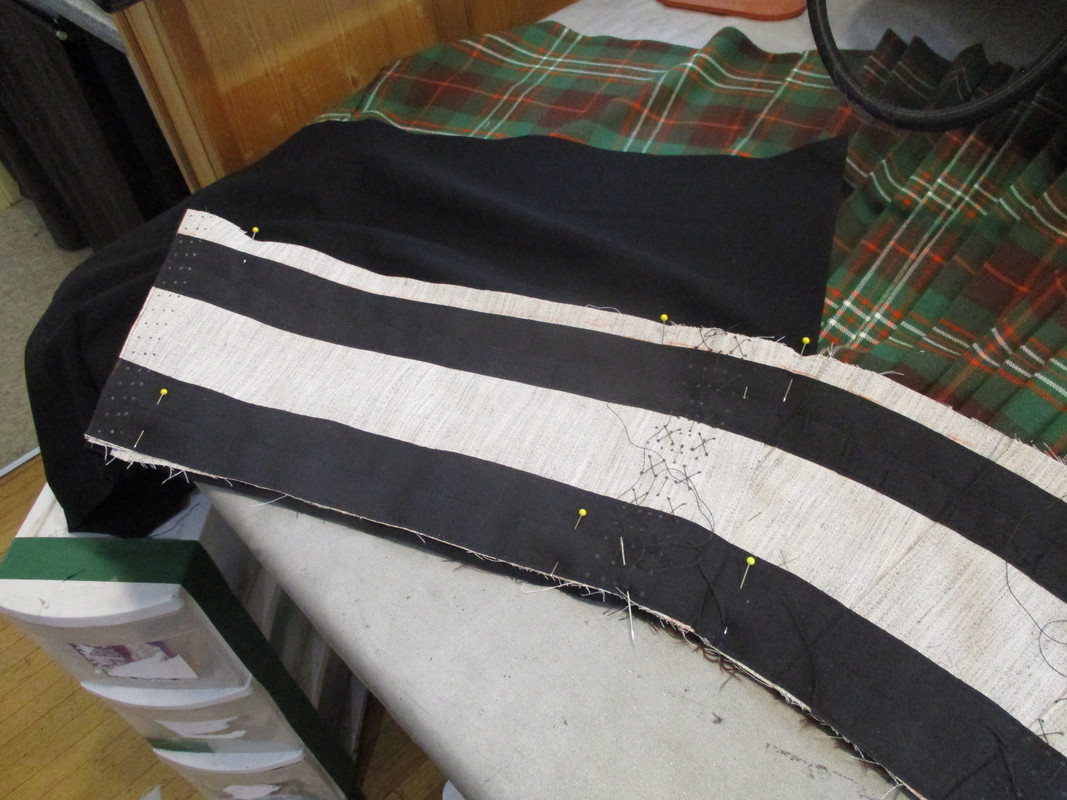
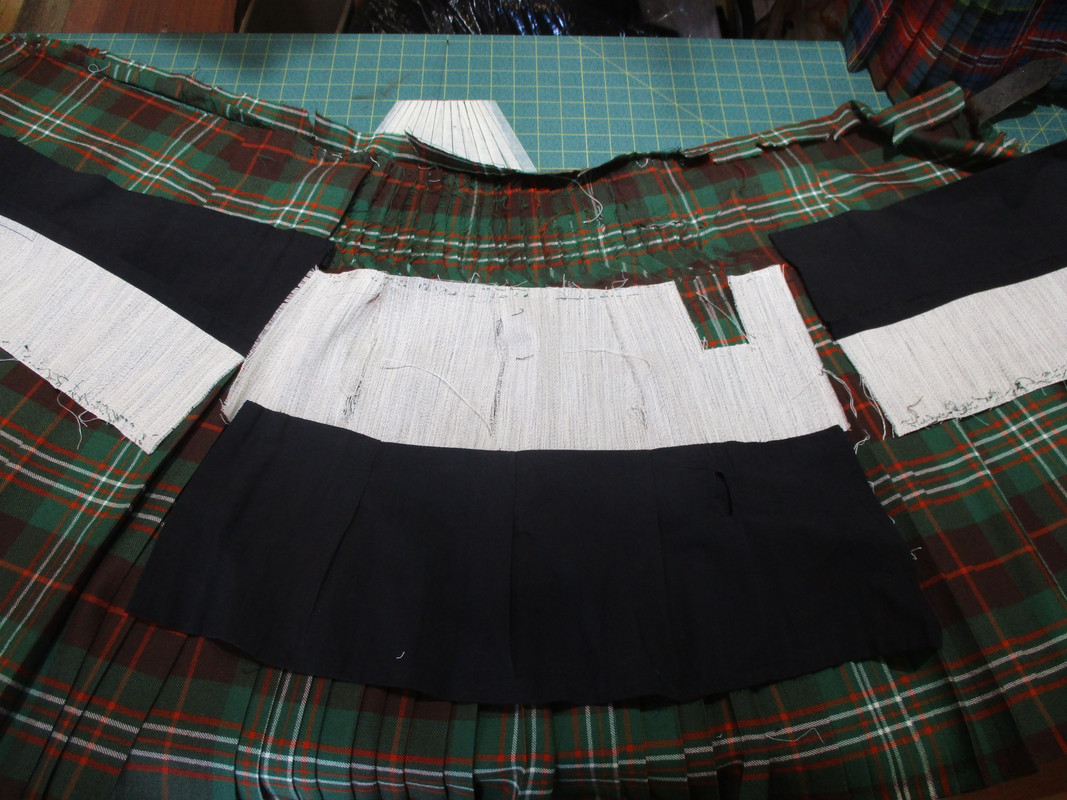
    This is one of the hallmarks of the Contemporary style. The interfacing which provides the vertical stiffness and body to the kilt is three layers folded to take the curve of the Fell. Under each apron are two full layers. These are then machine stitched into one integrated unit. This is separate from the kilt itself so needs to be firmly anchored inside the kilt

    The two narrow black strips you see in the photo above are the Stabilizer. This kilt will retain the third strap and buckle on the right side so a lower Stabilizer strip is needed for that just as the upper two straps and buckles. The Stabilizer forms the horizontal strength of the kilt sort of like a belt. These must be made from a fabric with no stretch. I use a woven fabric with heat fusible backing to 'tack' the Stabilizer into position which is then moved over to the sewing machine and stitched firmly to the interfacing.

    The larger black part in the above photo is the piece of liner inside the apron. I install this under the interfacing and then fold it up. This totally encases the interfacing so it is not seen on my kilts.

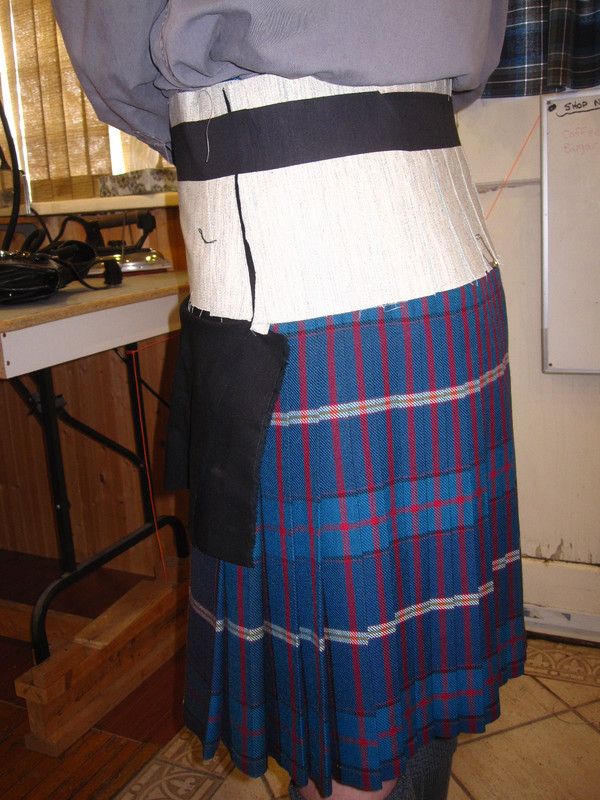
    This type of Interfacing and Stabilizer become one integrated unit. When you strap the kilt on you are actually wearing the Interfacing and Stabilizer. The outer Tartan fabric can then drape naturally outside without stress or distortion.

    Here is one of my own kilts worn inside out without the liner covering the interfacing to show this.


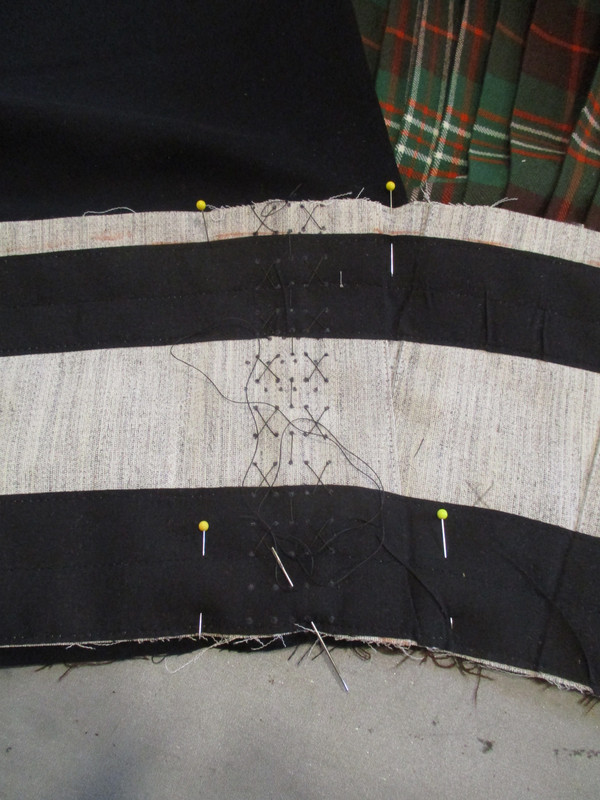
    This unit is then firmly anchored to the inside of the kilt to keep it in place and to prevent it from balling up during washing. Just as you do when stitching the Steeking line, the goal is to go through as many layers of the inside of the pleats without going all the way through and showing on the outside.


    The customer will be in this morning for a fitting so I must finish the next step which is to get the waistbanding stitched on.
    Last edited by Steve Ashton; 19th June 19 at 05:39 PM.
    Steve Ashton
    www.freedomkilts.com
    Skype (webcam enabled) thewizardofbc
    I wear the kilt because:
    Swish + Swagger = Swoon.

  12. The Following 4 Users say 'Aye' to The Wizard of BC For This Useful Post:


  13. #8
    Join Date
    24th September 04
    Location
    Victoria, BC Canada 48° 25' 47.31"N 123° 20' 4.59" W
    Posts
    4,311
    Mentioned
    16 Post(s)
    Tagged
    0 Thread(s)
    To tell the truth I got so wrapped up in kilt making that I totally forgot about this thread until the customer came to pick up her re-built kilt today.

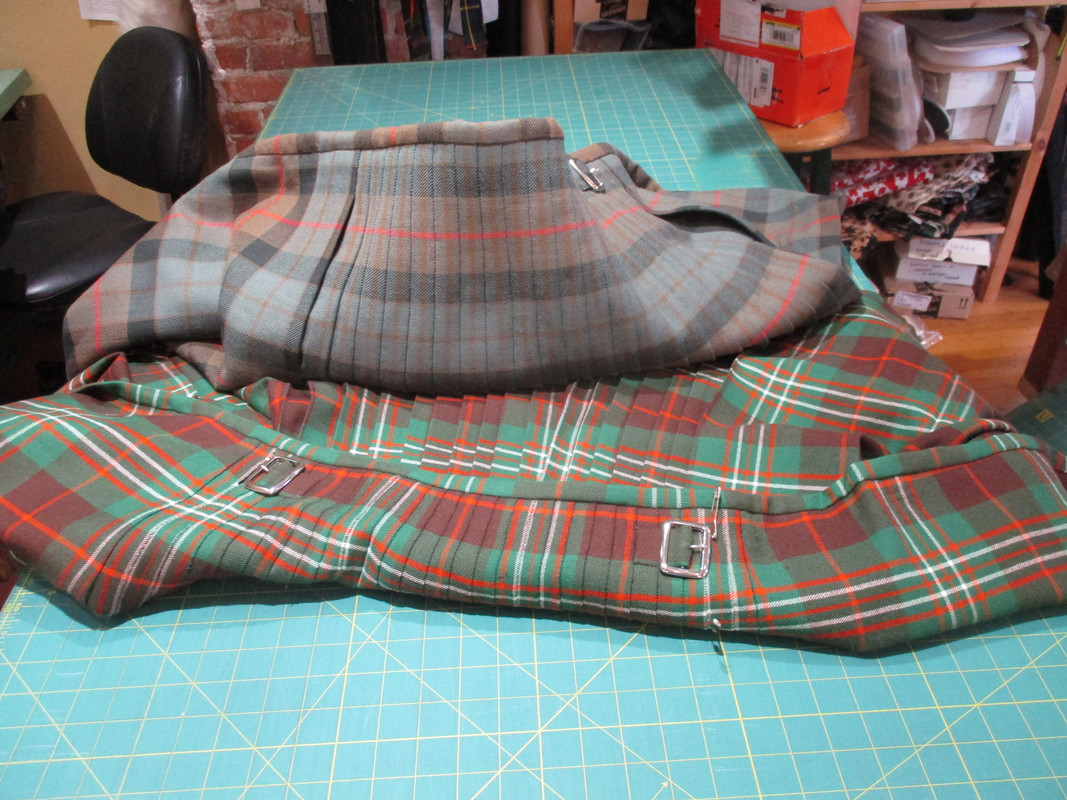
    So here is what it looks like now.

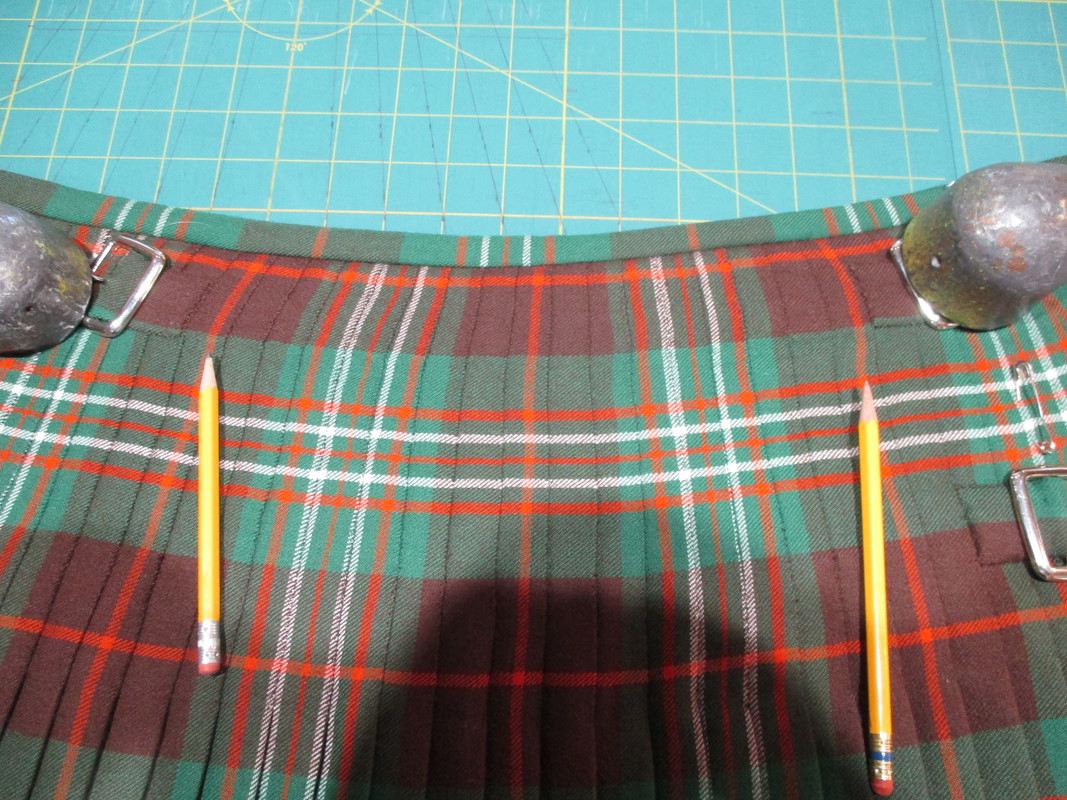
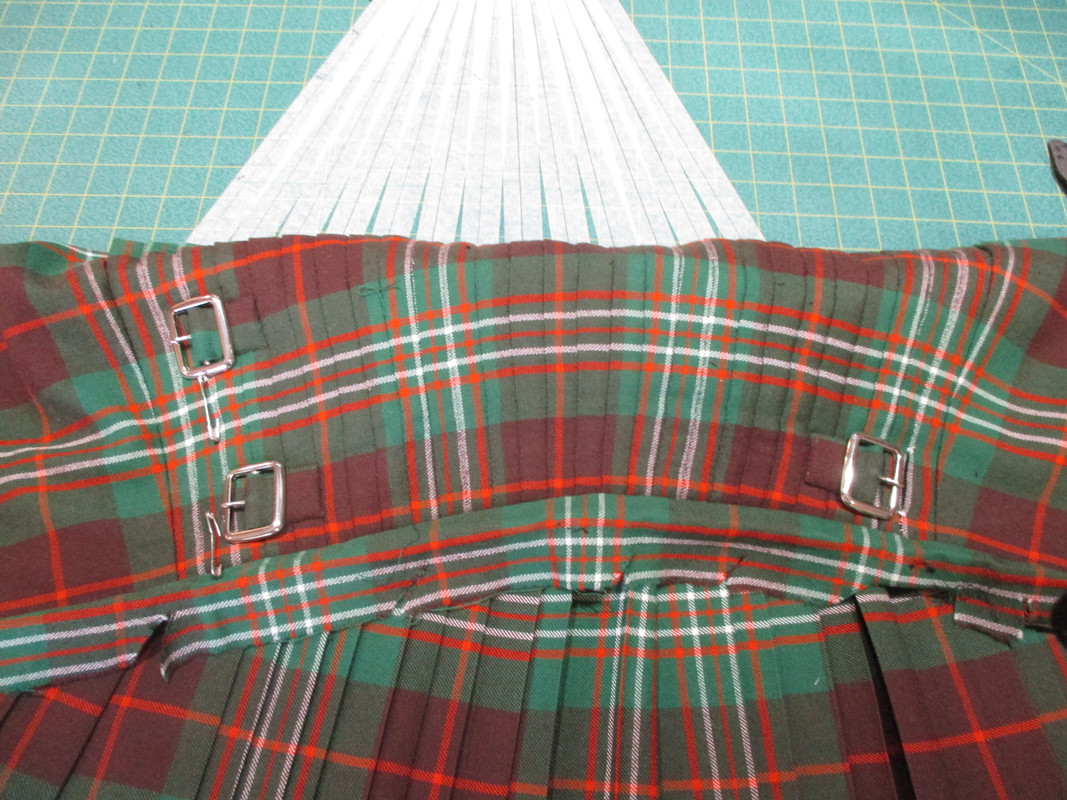
    With the new stabilizer and interfacing in, the straps and buckles are now firmly anchored all the way to the stabilizer. The left strap hole is closed to eliminate the weak point.

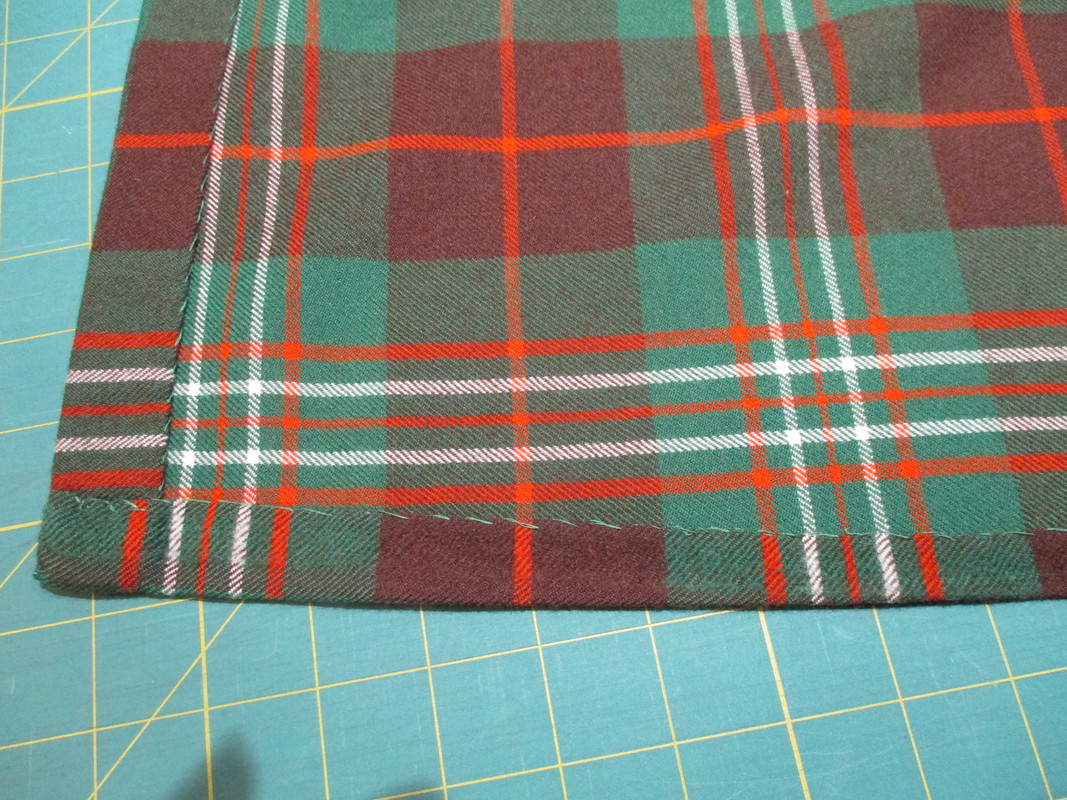
    Notice please that all of the large stitches made with bright green thread have been redone. Seven pleats that had been sewn with thick cotton thread were re-stitched.


    The new internal elements now allow the Fell area to stand up by itself.
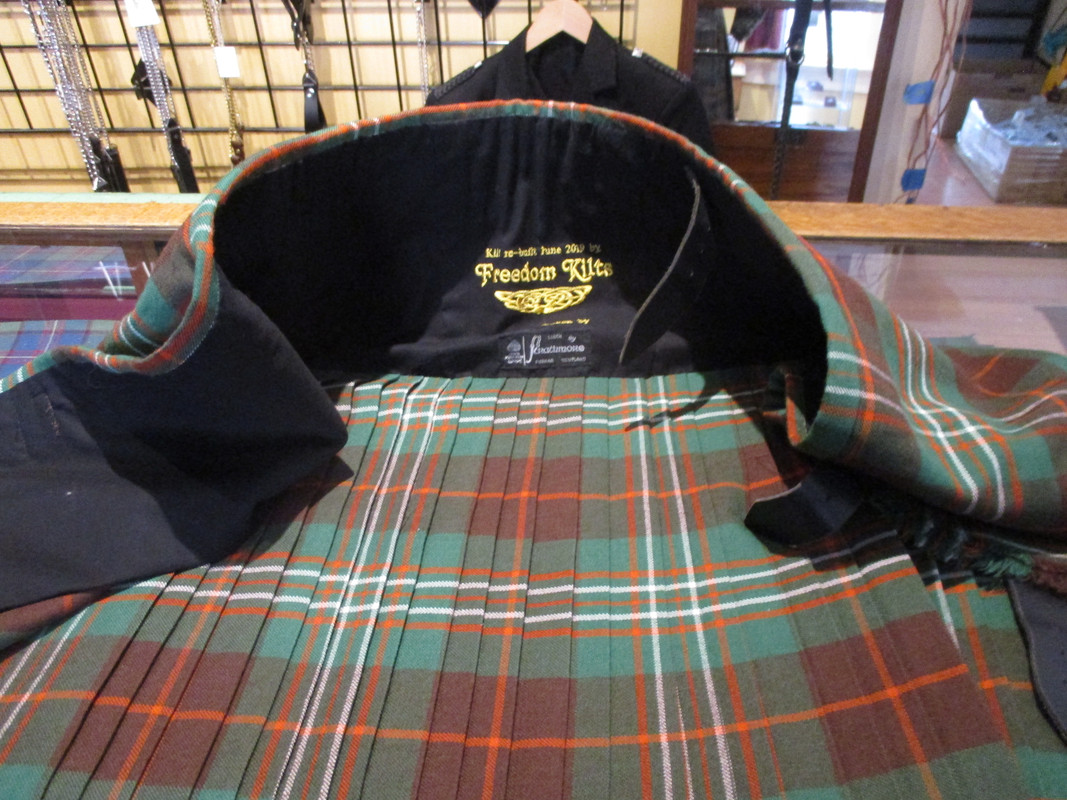


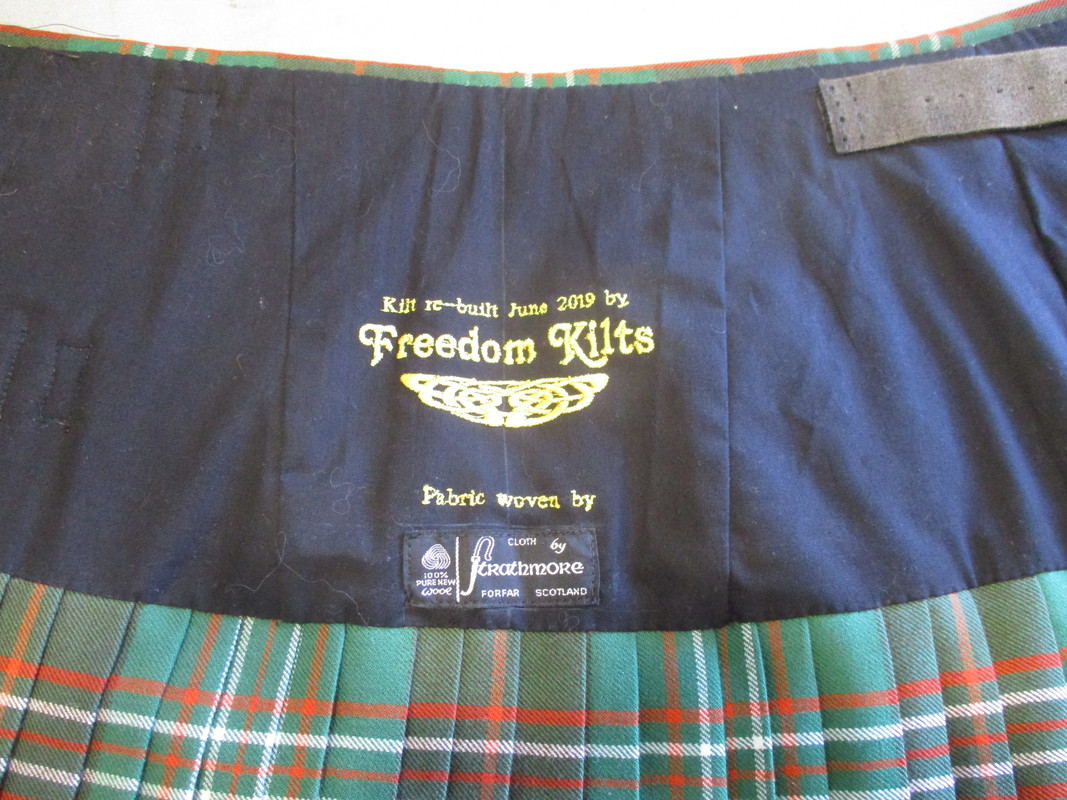
    And because some of the history of the kilt was lost when the name of the original maker had been removed, I tried to give the customer some of the history back.


    The customer tried the kilt on and the first comment she made was "Wow, it feels like a kilt again."


    The back hangs the way it should again and the swish is back.
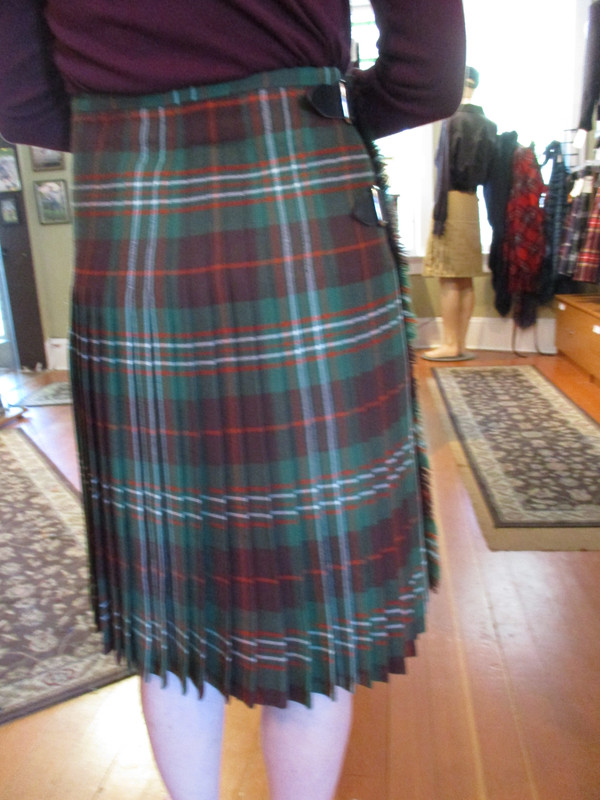


    As I said earlier, this was not an attempt to knock any one maker. I did however, want others to know and understand that not all kilts are made the same. This is one of the reasons that I dislike the word "traditional". Over the years there have been thousands of kiltmakers. Each trying to find a way for their product to stand apart from all the rest.

    But everyone needs some way to tell if the kilt they are looking at is a quality product.

    The stretch test is one of the most telling ways you can easily gauge the quality. It will tell you in just a moment if the garment you are looking at will survive wearing more often than a once-a-year Burns Dinner.

    Then look at the details. Look at the stitching. Is it neat and on a hand stitched kilt does any stitching show through to the outside?
    Does the Tartan pattern display correctly in the back? Do the aprons and pleats hang straight and parallel and do the edges of the aprons flip out unsightly?


    So here ends my peek inside what was advertised as "A premium quality Traditional kilt". I hope that this little peek inside a kilt gives others a better idea of what needs to be hidden behind the liner of their kilt.
    And hopefully, this will give everyone a little more information on gauging the quality of a potential purchase.
    Steve Ashton
    Forum Owner

  14. The Following 11 Users say 'Aye' to Steve Ashton For This Useful Post:


  15. #9
    Join Date
    26th December 18
    Location
    Nova Scotia
    Posts
    300
    Mentioned
    1 Post(s)
    Tagged
    0 Thread(s)
    Steve,

    Thanks so much for this (and other) useful post - seeing the internal construction has been a great learning experience. As someone who is planning to try making their own kilt, the information and images you share are invaluable.

    In addition to my tank, I have a couple of cheap acrylic kilts that I picked up locally for places I don't want to wear my tank. Armed with the knowledge from your threads, I have added a stabilizer and interfacing to both as well as basting and repressing. They're still not perfect but they do hang better and I got rid of (mostly) the shower curtain effect.

    I know in terms of these kilts it really wasn't worth the time, but I used it as a chance to practice the techniques I need when I take the plunge on my own.

    Thanks again!

    Shane

  16. The Following User Says 'Aye' to gsmacleod For This Useful Post:


Bookmarks

Posting Permissions

  • You may not post new threads
  • You may not post replies
  • You may not post attachments
  • You may not edit your posts
  •  

» Log in

User Name:

Password:

Not a member yet?
Register Now!
Powered by vBadvanced CMPS v4.2.0