|
-
1st April 20, 10:13 AM
#1
100% home made and hand stitched
Well it's been a while, but I eventually finished.
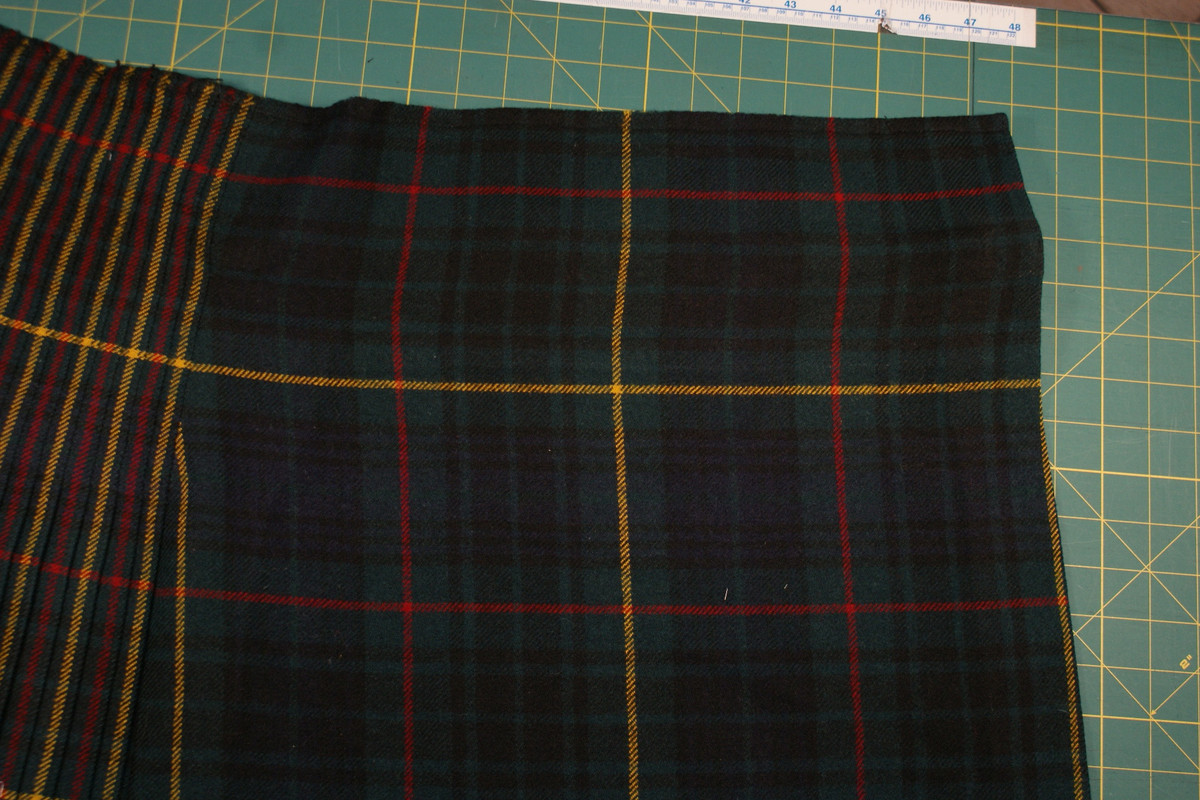
100% hand stitched, starting with a 5 yrds of double width tartan. And ended with something I think looks ok, oh, and plenty of holes in fingers from pins and needles.
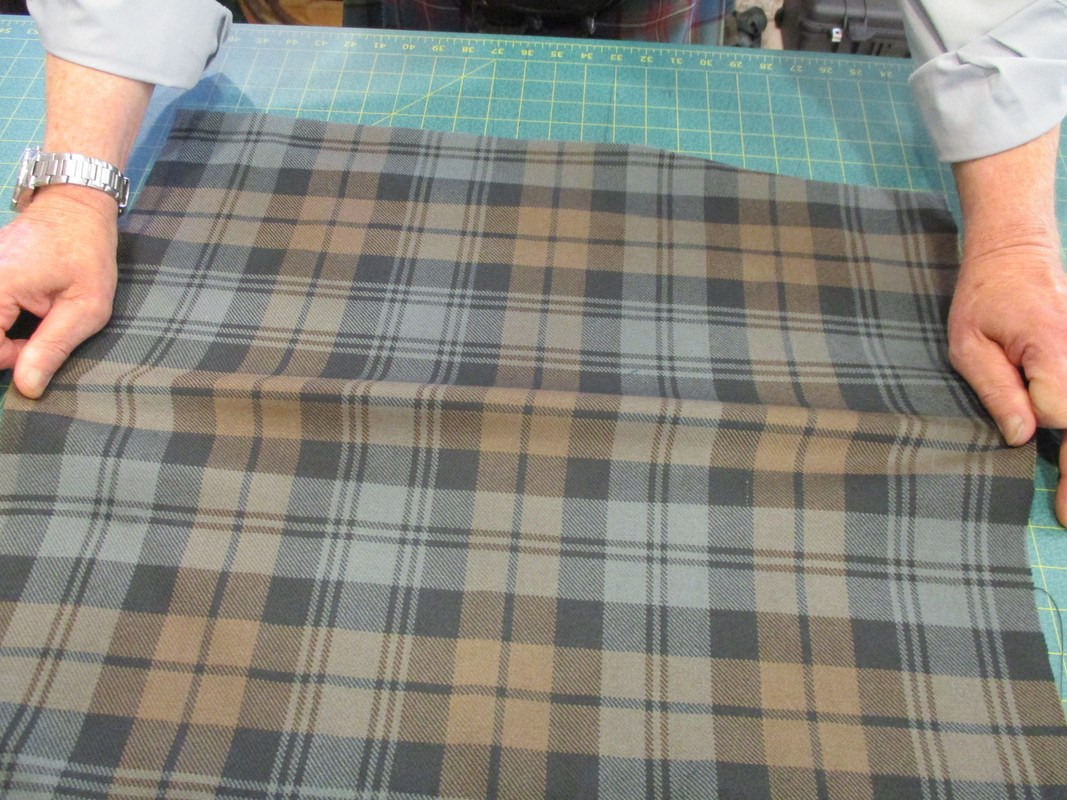
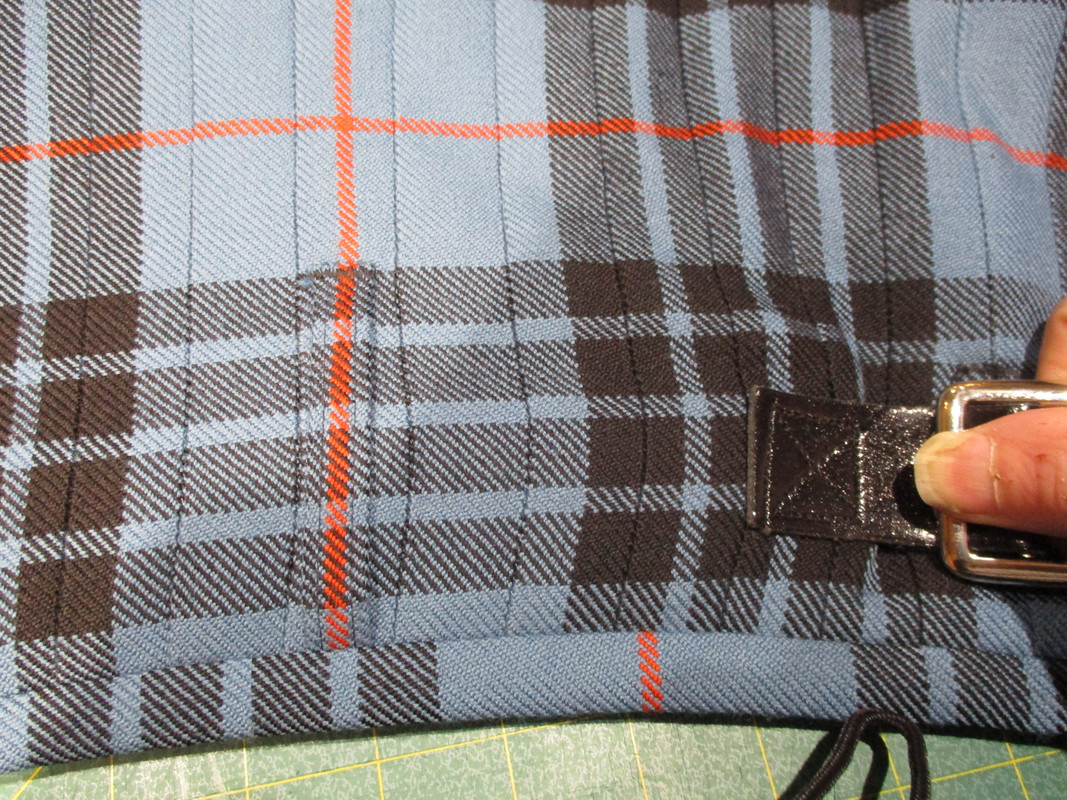
This was after sewing and basting the initial pleating, the selvedge at the bottom of the picture
IMG-20200207-083005970.jpg
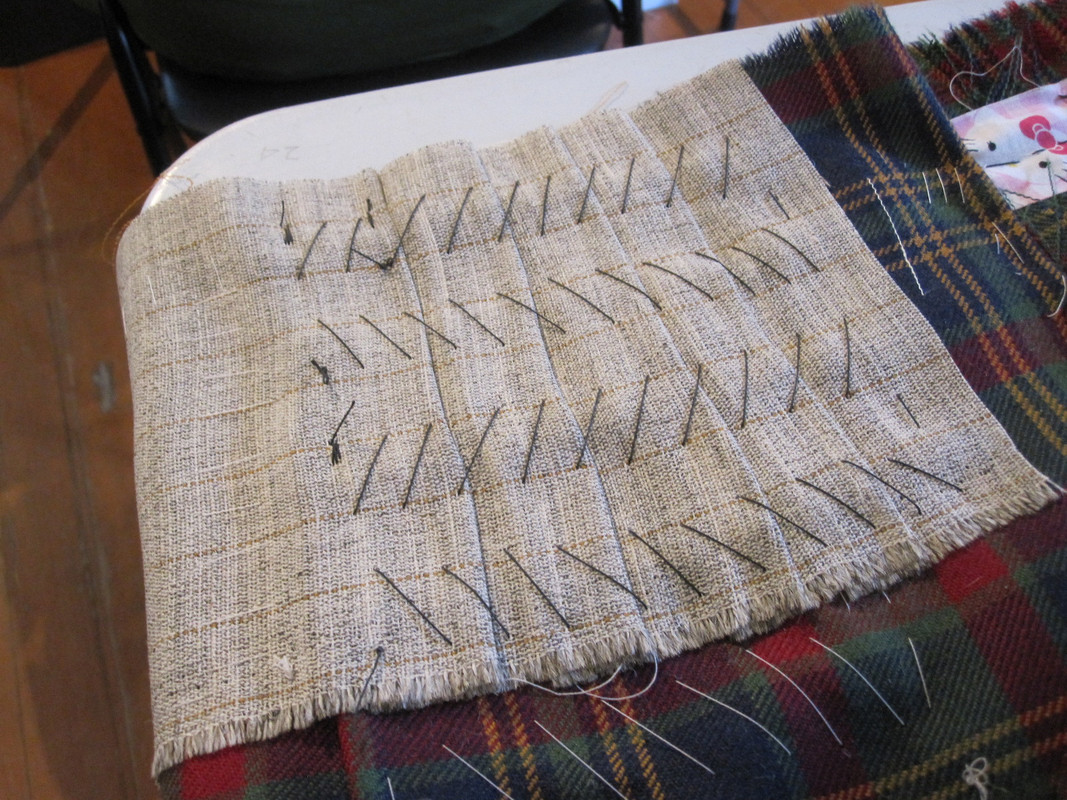
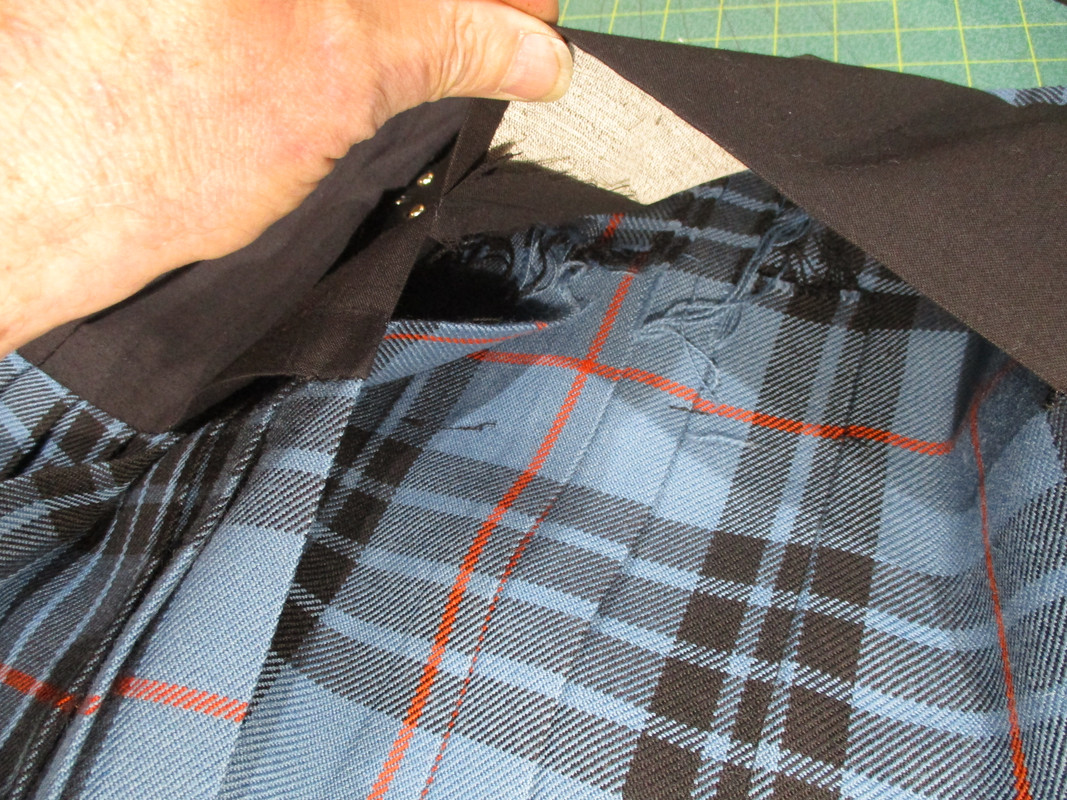
Adding the canvass
IMG-20200318-111937965.jpg
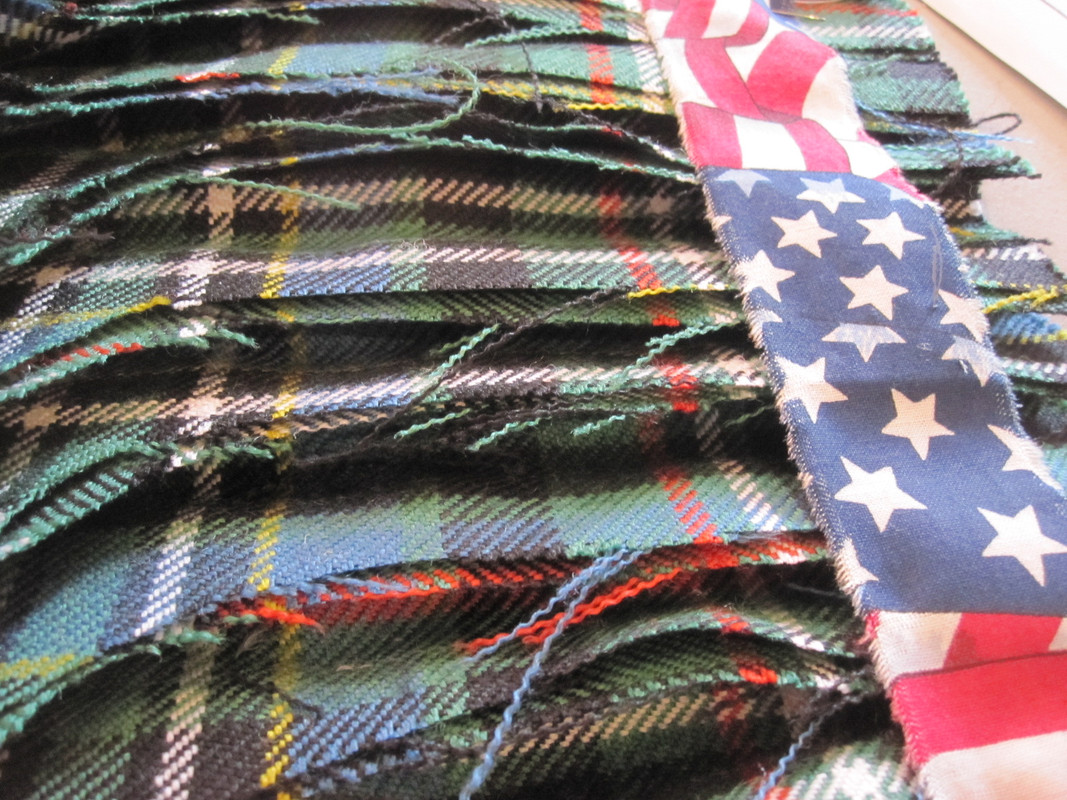
The canvass joined at the buttonhole with the tartan folded back on both sides of the buttonhole and laced together at the centre
IMG-20200318-111952221.jpg
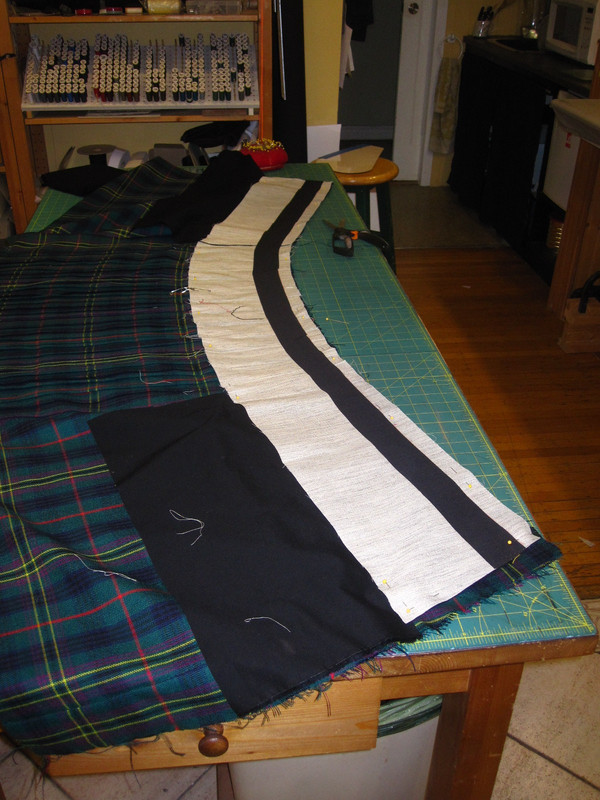
The lining added
IMG-20200330-121310128.jpg
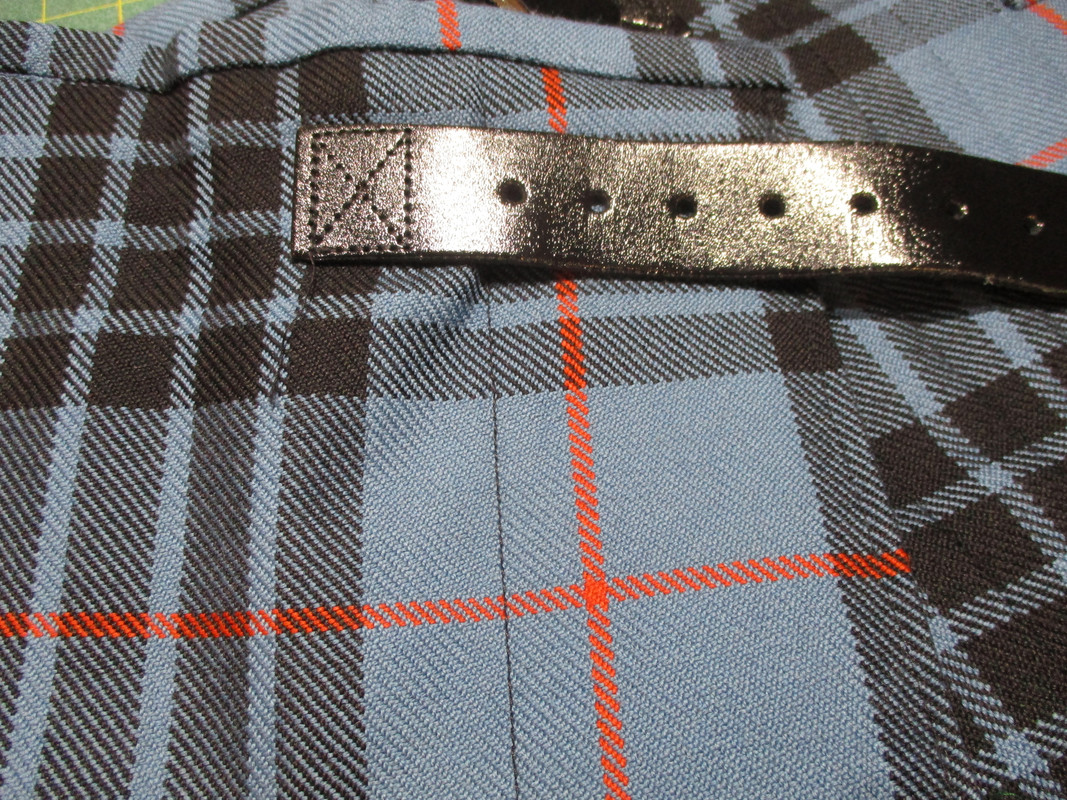
Front view
IMG-20200401-175335968.jpg
Side
IMG-20200401-175528941.jpg
Hopefully I got the pictures right this time
Comments and critiques welcome, especially from kiltmakers who know what they are doing
Proud member of the MacDonalds of Clanranald.
-
The Following 19 Users say 'Aye' to kilted Mnementh For This Useful Post:
Blaidd,California Highlander,Dirty Rogue,EagleJCS,Father Bill,FossilHunter,gsmacleod,imbrius,jhockin,Kiltedjohn,Laird O'the Cowcaddens,Liam,Macman,McMurdo,Me cousin Jack,MichiganKyle,Panache,Shinenotburn,StevenG
-
1st April 20, 12:14 PM
#2
Looks wonderful. I'm sure you will wear it with pride, good for you.
-
-
1st April 20, 12:19 PM
#3
-
-
1st April 20, 01:25 PM
#4
Good work kinsman. You mention buttonholes, did you use buttons instead of buckles?
Descendant of the Gillises and MacDonalds of North Morar.
-
-
1st April 20, 02:00 PM
#5
May I ask please - Did you include a stabilizer strip?
Did you sew the different sections of the interfacing together to act as one continuous piece? Or they still separate?
What method or school of kiltmaking did you follow?
Steve Ashton
www.freedomkilts.com
Skype (webcam enabled) thewizardofbc
I wear the kilt because: Swish + Swagger = Swoon.
-
-
1st April 20, 03:43 PM
#6
 Originally Posted by FossilHunter

Good work kinsman. You mention buttonholes, did you use buttons instead of buckles?
The buttonhole is the gap where the inner apron strap passes through the kilt to the buckle. I used two buckles, did not use low buckle on outer apron
Proud member of the MacDonalds of Clanranald.
-
The Following User Says 'Aye' to kilted Mnementh For This Useful Post:
-
1st April 20, 04:00 PM
#7
Originally Posted by The Wizard of BC
May I ask please - Did you include a stabilizer strip?
Did you sew the different sections of the interfacing together to act as one continuous piece? Or they still separate?
What method or school of kiltmaking did you follow?
Not certain what you mean by stabiliser strip. I used quite stiff canvas (horsehair blend) in 2 continuous strips 5 1/2 inch wide, I fold them to follow the curve of the aprons and rear body, and sew the folds in place with blanket stitch plus 6 rows of herringbone stitch across the whole width of the canvas to keep them solid. At the buttonhole I bring the canvass tight to the buttonhole flaps, then fold back the tartan and herringbone it all together. I use lacing strip to bind the 2 sides tightly together so it secures the canvas almost as if it was a single strip. This pic may show better IMG-20200318-111945966.jpg
As to school/methods, I have the book "The Art of Kilt Making" which is very helpful and explains a lot, I also watch Robert MacDonald a kiltmaker on youtube who is happy to show methods and tips. I understand better from seeing than I do from reading.
My first attempt was to unpick a old kilt and try to understand the construction from there, my resulting kilt was not very good. So I spent more time practicing on cheap PV tartan until I though I had cracked it, then moved to proper tartan. So I guess you could say I'm not of any school or method, purely amateur who is trying to improve.
Last edited by kilted Mnementh; 1st April 20 at 04:16 PM.
Proud member of the MacDonalds of Clanranald.
-
-
1st April 20, 05:12 PM
#8
In "The Art of Kiltmaking", on page 93 is where you find the instructions for the Stabilizer strip.
The internal construction of a kilt is hidden under the liner so many people do not understand that a kilt is not made like a pair of blue jeans.
Blue jeans derive the strength of the garment from the strength of the denim fabric and the double lines of machine stitching.
But kilt wool is supple. If you pull on it you will see it stretch and distort.
Without some sort of reinforcement all the stresses of strapping the kilt on and moving around are transferred to the outer fabric and the stitching.
Hand stitching is inherently weaker than machine stitching, the fabric will stretch, and we cut away the excess fabric behind the Fell Area all weakening the overall integrity of the garment.
So a kilt is made more like a custom made, top quality, suit coat. Hidden behind the liner of a suit coat are the strengthining elements that take up the stress and allow the outer fabric to drape naturally.
There are two components to the inner reinforcements built into a kilt.
The stabilizer is a horizontal strip of any fabric what will not stretch. Broadcloth or a piece of old pillowcase are perfect.
The stabilizer acts like a belt built inside the kilt to take up all the horizontal stress.
Here is the Stabilizer strip being sewn into a kilt by Barb Tewksbury.
Then there is the interfacing. This is usually what is called "Hair Canvas" or "Chest Canvas".
The interfacing is what gives vertical stiffness to the kilt.
Here is the interfacing of a Tewksbury.
I make my kilts without the left strap hole. The left strap is inside the kilt. This eliminates the built in weak point of a hole in the garment and allows for quick and easy alteration if it should ever become necessary due to weight changes.
Eliminating the strap hole also allows the stabilizer strip to be extended the full width of the kilt from one apron outer edge, all the way across to the other apron outer edge.
The stabilizer serving as an internal belt and the interfacing giving vertical stiffness so the garment are then sewn into one, integral element. This allows the outer fabric to drape naturally without stress or distortion. Especially across the front of the aprons.
Many old military kilts and some made with a similar method to Rob MacDonald use a much smaller linen strip for the stabilizer and the interfacing is actual canvas similar to a burlap bag.
These kilts can often suffer from distortion of the outer Tartan fabric as the inner elements stretch over time.
And many of the older kilts, especially those made just after both world wars, when some sewing supplies were in short supply, were sewn with cotton thread. This rots over time and the entire inner construction falls apart.
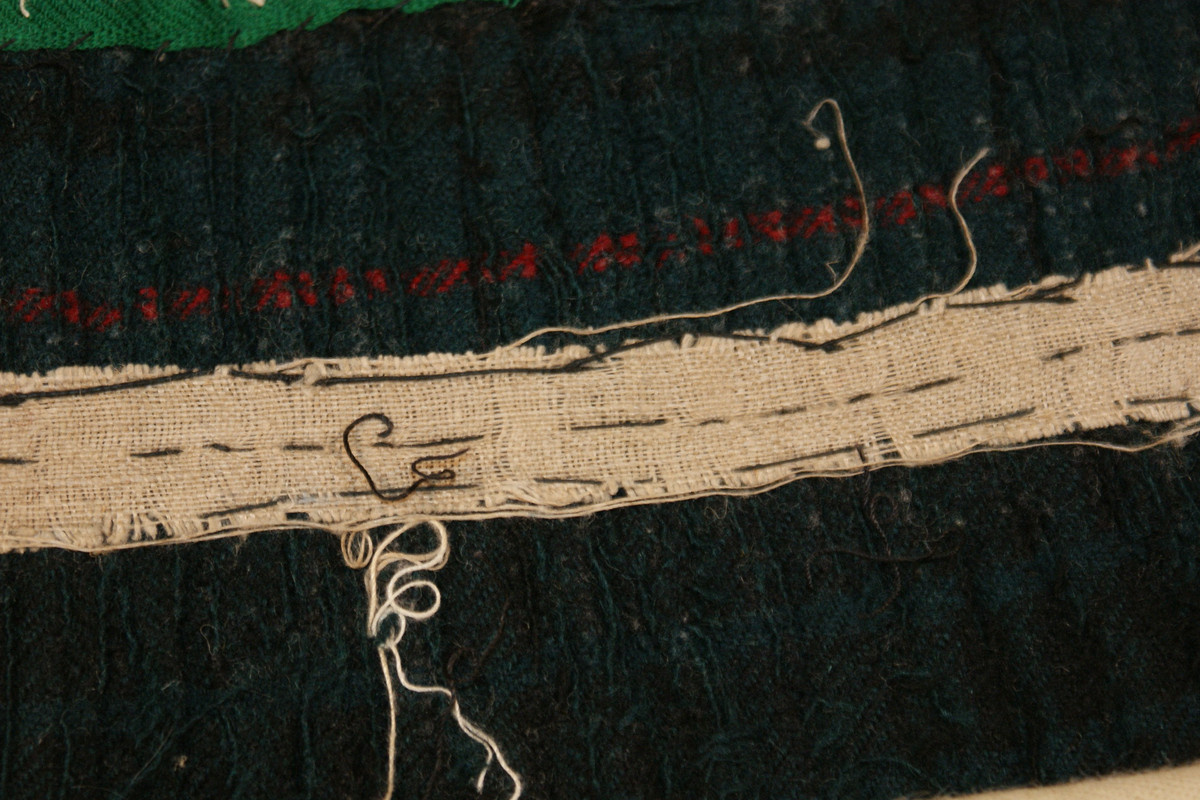
And this is the result. The outer Tartan fabric of this Gordon & Son's. kilt is still fine. Only the inner stitching has failed causing the stabilizer and the interfacing to fail.
Notice please in the above photo that the buckle tabs are still in place. This is another fault in this kilt.
When you sew the buckle tabs on you MUST sew all the way through the outer Tartan fabric and and through the interfacing, firmly anchoring them to the stabilizer strip.
To illustrate what the internal elements of a kilt do, and how, here is a kilt worn inside out, just before the inner liner is lightly tacked in place to cover it all up nice and neat.
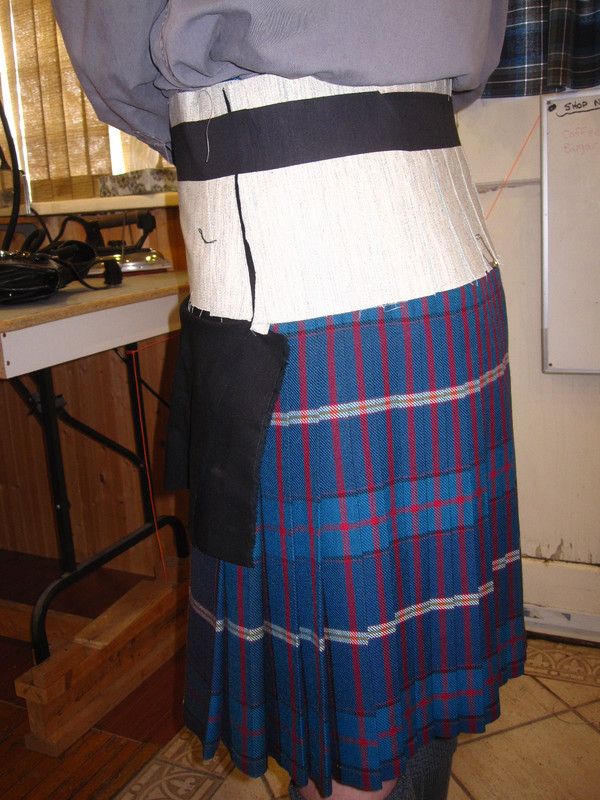
Oh, and by the way. Many people, because they never know about all of this stuff hidden behind the liner, assume that the liner is a structural element of the kilt or assume that it is put there to keep the kilt clean. The liner is just lightly tacked into place and its only purpose is to cover and hide the pleat cut-aways, the stabilizer, and the interfacing. And if it were to keep the kilt clean it would be removable and washable.
Steve Ashton
www.freedomkilts.com
Skype (webcam enabled) thewizardofbc
I wear the kilt because: Swish + Swagger = Swoon.
-
The Following 5 Users say 'Aye' to The Wizard of BC For This Useful Post:
-
1st April 20, 09:22 PM
#9
Thanks for that explanation. As I said I find it harder to learn from reading about than by watching, but you made it quite clear, that coupled with the fact that I have only just completed the work make it fairly easy to visualise for me.
I'll have to hope that the canvas is strong enough as both stabiliser and interface for now as I can't get more supplies with the Covid 19 situation. The canvas is pretty stiff, it has a tiny bit of give across the 5 1/2 inch width, but even pulling it hard I couldn't feel any give along the length that follows the waistline. I did sew the tabs front to rear through the entire structure, tartan, canvas and lining, I use Guttermans polyester thread for the sewing as it doesn't rot, while being stronger than cotton thread, and unless I'm using excessive heat which will burn the tartan, the thread won't be affected by the iron.
I appreciate your critique and advice, it's what I was hoping for. I have no real training so admit happily I will make mistakes. Learning from your mistakes is hard if you never get told you've made one.
A quick question here, had I been somebody in training as a kiltmaker, would I had taken a clout across the ear and shown the door as being useless, or would I be told to pick up my game and repair the fault as showing some promise?
Quick edit. Forgot to mention that I had intended to be doing a through visual inspection of the kilt after 2 weeks of use, to check that everything was still as tight it should be. I was told many years ago by my DI that I should check my kilt very closely every month for damage that does not show in a daily inspection, I still do that to this day, even with my professionally made kilts
Last edited by kilted Mnementh; 1st April 20 at 09:31 PM.
Proud member of the MacDonalds of Clanranald.
-
-
1st April 20, 11:13 PM
#10
There is a really quick and easy check that you can do.
It is called the stretch test.
Begin at the back. Grab the two buckles and pull them apart. It does not need much force, only about 3-4 lbs of pull. Watch across the back of the kilt, at the pleats. You should not see any give or stretch between the buckles. Absolutely none.
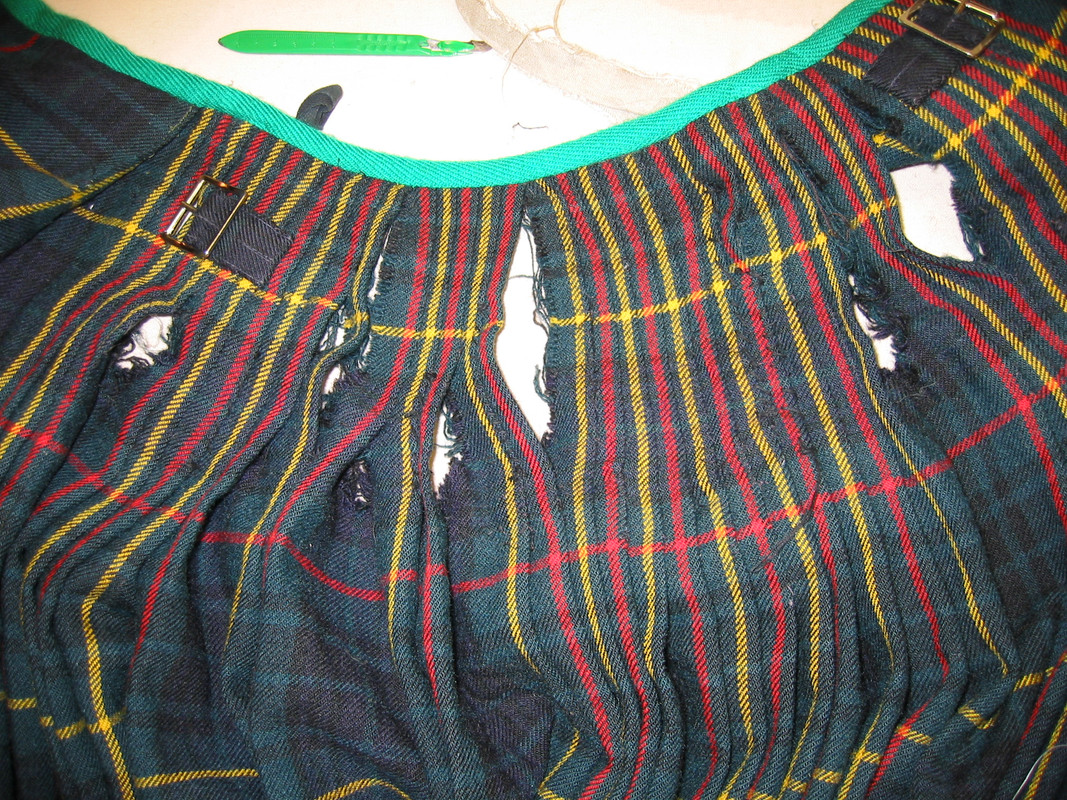
Here is a kilt that fails the stretch test in a rather dramatic way. Can you see that the kilt has stretched, the fabric distorted and the stitches are under stress?
And this is only about 2 lbs. of pull.
The most common cause of failing the back stretch test is that the stabilizer has been left out, the buckle tabs have not been anchored to the stabilizer or the stitching of the stabilizer and/or interfacing is too loose.
Then do the same thing with both aprons. Grab a strap and a buckle and pull. Again, there should be no stretch, none, nada. The apron edge where the strap is sewn on should not distort and no puckering should appear across the middle of the aprons. Check to see if the strap hole shows any hint of distortion.
Any stretch or distortion in the aprons is usually caused by the pieces of the interfacing not being sewn together into one integral unit or the strap has not been sewn all the way through, or the stitching is too loose. The kilt in this photo is brand new and you can see that there is no pull on this strap at all. The distortion is quite evident
In this kilt, while there is a liner and there is interfacing - and this kilt was sold as a premium quality, hand stitched Traditional kilt - they are present in name only.
If your kilt fails the stretch test it may be a good idea to take the liner out and install a stabilizer and check that the interfacing and buckle tab and strap stitching is nice and secure.
You would only be out a day, maybe a day and half's worth of work to make the kilt right.
The stretch test checks in the horizontal direction. This tests the stabilizer.
To check if the interfacing is doing what it is supposed to do try to stand the kilt up all by itself.
The kilt in the front has failed. The kilt in the back passes.

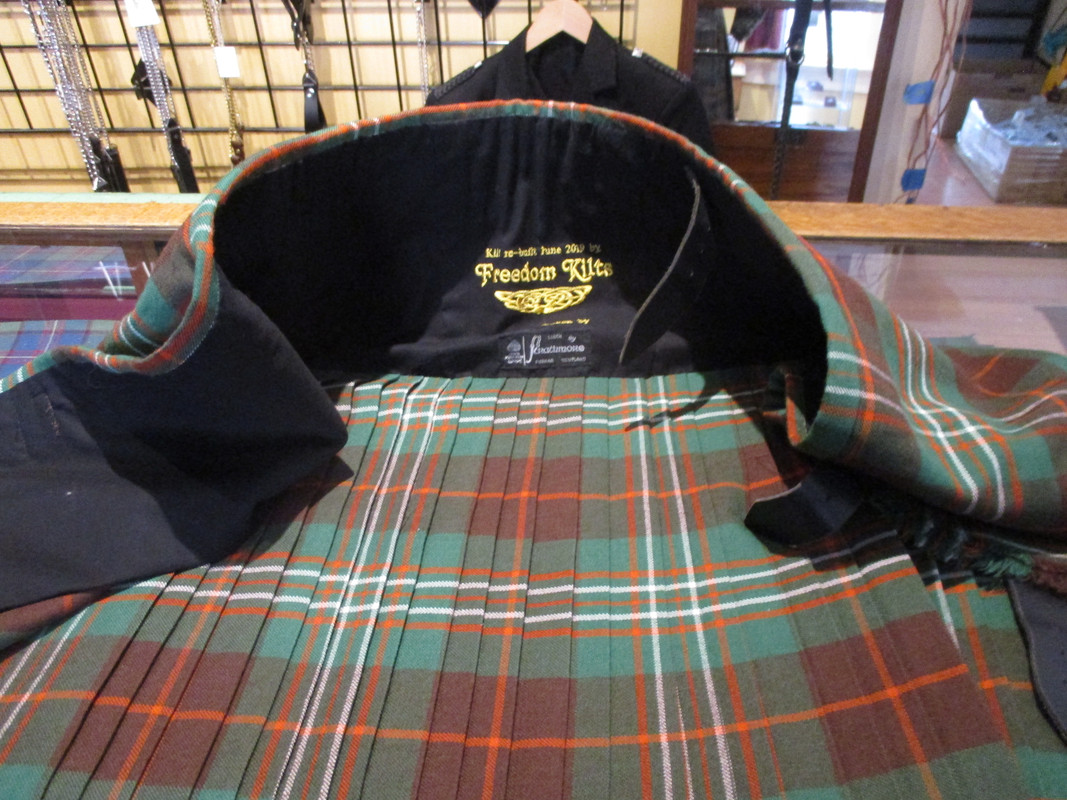
But after a re-build the kilt passes with flying colors.
Last edited by The Wizard of BC; 1st April 20 at 11:35 PM.
Steve Ashton
www.freedomkilts.com
Skype (webcam enabled) thewizardofbc
I wear the kilt because: Swish + Swagger = Swoon.
-
The Following 8 Users say 'Aye' to The Wizard of BC For This Useful Post:
Tags for this Thread
 Posting Permissions
- You may not post new threads
- You may not post replies
- You may not post attachments
- You may not edit your posts
-
Forum Rules
|
|


Bookmarks