|
-
26th April 20, 03:27 PM
#11
Wonderful information! My sweetie, @carolinanan117, finds this very helpful. Thanks!
Allen Sinclair, FSA Scot
Eastern Region Vice President
North Carolina Commissioner
Clan Sinclair Association (USA)
-
-
26th April 20, 05:23 PM
#12
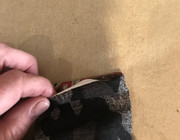
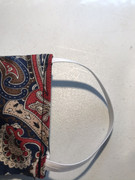
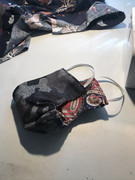
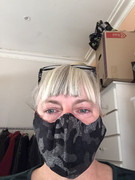
Here we go... the boredom is real!
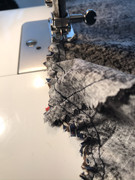
Picture heavy but heres the basics.
Cut 2 suitable fabrics right sides together
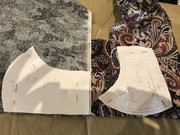
Stick a pin in to keep together and go to the sewing machine
I chain sew them with a few reverse stitches to hold them (this isnt couture sewing)
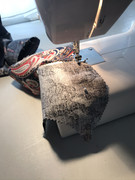
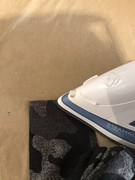
Back to the ironing board
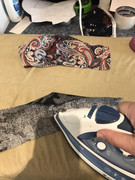
Press to set the stitches

Then press open to one side
Pin the 2 pieces right sides together along the top (and bottom if you wish)
Back to the machine and sew top & bottom

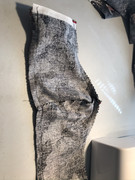
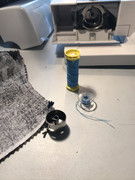
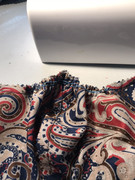
Hand wind shirring elastic on a bobbin and change bobbins
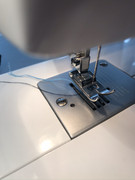
Sew within the top seam from the curve- use a couple of reverse stitches to hold- sew to the curve on the other side.-couple more reverse stitches
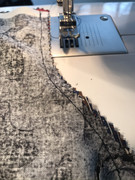
Turn and sew back over -staying in the seam allowance - couple more reverse stitches to hold
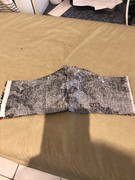
Pic from the wrong side showing the shirring elastic
Back to the ironing board
Turn through to the right side
Carefully iron to make it neat along the top and bottom seams- dont worry about pressing the area that was stirred perfectly
On the open sides turn under and press - sides even (this can be a reversible mask)
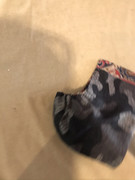
Back to the sewing machine (remember to change the bobbin back)
Cut 2 lengths of elastic that will go over the ears- or cords or ties or ribbon or whatever
Tuck in one end and start sewing -making sure to reverse backwards & forwards 2-4 times

Sew towards the end tucking in the other end of elastic or whatever youre using
(Be careful not to twist the elastic)
Remember to reverse a few times
Do the other side
Look FABULOUS
-
The Following 7 Users say 'Aye' to Lady Grey For This Useful Post:
-
27th April 20, 09:15 AM
#13
Lots of interesting discussion here for techniques on how to make them, but it doesn't help those of us who don't sew!  My original question was whether some of our DIYers were interested in making them and selling them to forum members, but it sounds like there's not much interest there. I may have to go find a needle and thread and do this by hand with my terrible hand-stitching that looks like a drunk guy did it. My original question was whether some of our DIYers were interested in making them and selling them to forum members, but it sounds like there's not much interest there. I may have to go find a needle and thread and do this by hand with my terrible hand-stitching that looks like a drunk guy did it.
I've been searching around some more, and I actually think this one may be the best pattern:
https://dhuratadavies.com/blogs/thin...n-and-tutorial
What I like about it is that it has a dart for over the nose as well as under the chin (with an extra stitch line under the chin to flatten it across the width of the chin before it turns under), but each layer is made from only one piece of material. So there's no centre seam that makes it difficult to get good alignment on patterned material. One would only need to press the material with a straight fold along a tartan line, for example, to get the pattern mirrored equally on both sides. This mask pattern seems to get good conformity to face shapes (the pattern has different sizes for a custom fit) while being friendly to a tartan pattern.
-
-
28th April 20, 12:25 PM
#14
OK, it only took me about 9 man-hours to make this thing.  But I did it! And all by myself! But I did it! And all by myself!
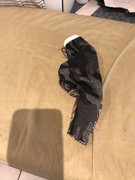
This is from the pattern in my previous post, using some of the tartan scrap material I got from Barb Tewksbury. It's three layers of material (wool tartan outside, fiber interfacing middle, cotton inside), all hand-stitched, with a bootlaces for the tie. I'm actually sort of proud of myself for the tartan lines being so well aligned at the darts/seams, even though my stitching still looks like hell where you can see it. And hey, I only drew blood with the needle 6 times!
This mask almost completely covers my beard, which surprised me. Especially under the chin. About the only thing I'll do differently if I make another one is to add a wire or thin metal strip (aluminum flashing, probably) over the nose.
 
  
-
The Following 13 Users say 'Aye' to Tobus For This Useful Post:
ASinclair,EagleJCS,Father Bill,Jacques,KiltedDixon,Lady Grey,McMurdo,Me cousin Jack,pofloyd1,Red1leader,Richrail,ShaunMaxwell,ThistleDown
-
28th April 20, 02:23 PM
#15
Fabulous Fabulous Fabulous
-
The Following User Says 'Aye' to Lady Grey For This Useful Post:
-
28th April 20, 05:00 PM
#16
 Originally Posted by Lady Grey

Here we go... the boredom is real!
Picture heavy but here’s the basics.
Thanks! I think I get it now! I found some elastic thread in my sewing basket, so I can give it a whirl (otherwise I would be looking at ruching with elastic). I have to do something; I wore a mask for a few hours on Saturday, and it's Tuesday and there's still a red mark on my nose (I have to keep the wire pretty tight to try to keep my glasses from fogging up too much). Too much more and I'm afraid it could become permanent (NOT an attractive look, to appear as if I'm healing from a street fight. It works much better on Sylvester Stallone than the average woman).
A couple questions.
1. Is this something I should've done before I finished these to make it work properly? As in, added a bit of extra fabric for the part that will be gathered? I don't have much to spare... Also, it's hard to tell in the pictures, but should the shirring comprise the seam that goes over the top of the nose, instead of being added later?
2. Am I to be using regular thread for the top thread, or heavy-duty, since the elastic thread is so much wider than all-purpose thread?
Originally Posted by Tobus
Lots of interesting discussion here for techniques on how to make them, but it doesn't help those of us who don't sew! My original question was whether some of our DIYers were interested in making them and selling them to forum members, but it sounds like there's not much interest there. I may have to go find a needle and thread and do this by hand with my terrible hand-stitching that looks like a drunk guy did it.
I've been searching around some more, and I actually think this one may be the best pattern:
https://dhuratadavies.com/blogs/thin...n-and-tutorial
What I like about it is that it has a dart for over the nose as well as under the chin (with an extra stitch line under the chin to flatten it across the width of the chin before it turns under), but each layer is made from only one piece of material. So there's no centre seam that makes it difficult to get good alignment on patterned material. One would only need to press the material with a straight fold along a tartan line, for example, to get the pattern mirrored equally on both sides. This mask pattern seems to get good conformity to face shapes (the pattern has different sizes for a custom fit) while being friendly to a tartan pattern.
Sorry. I'm way too slow at making these to be able to make them for other people (and, it's not easy to get fabric right now; in my area it's either order online and hope it doesn't take weeks to ship-- I was set to order from fabric.com until they said it could take up to a month to ship-- or, my local store is closed but you can order online and use curbside pickup... and it took almost a week for my fabric to be ready; I'm sure it's worse now that there's more demand and I see rows of cars lined up to pick up orders). I'm a novice sewist who hadn't touched a machine in years. I made 8 of them, and it was the consuming project of the free time of my life for about two weeks, to the exclusion of other things I needed and wanted to do. I can't devote that kind of time again. I'm sure people who are experienced at sewing can turn them out in no time at all, but I'm not one of those people (everyone will say the sewing is fast. That's true, it's pretty quick. It's the cutting and pinning and ironing, etc. that can be time-consuming, and the part all of these "look how fast it is!" videos don't show when all of their pieces are pre-cut and ready to go, and they're just showing the actual sewing part).
FWIW, another pattern I found that I likely would have chosen to make instead of the one I did make, had I not only found it literally the day before I finished my masks, is this design (various videos; choose the one you like best). It's much simpler, but looks like it will still conform to the face. Some versions include filter pocket. https://www.youtube.com/results?search_query=3d+mask
Here's tae us - / Wha's like us - / Damn few - / And they're a' deid - /
Mair's the pity!
-
-
28th April 20, 05:14 PM
#17
@Katia
Whisking Lemon Curd
Ill be back in a bit to answer
-
-
28th April 20, 05:53 PM
#18
Oh my Lemon Curd is yummy!
Ok you’re over thinking
- no you don’t need to cut extra fabric or have bigger seams.
- no don’t add the shirring as part of sewing the seam put it in the seam allowance
That’s just make lots of extra hard work
-yes regular thread at the top - shirring elastic in the bobbin
This method WON’T give a tight-sealed fit (nor do Medical grade masks... that’s why Medical staff wear the plastic splash screen over the mask as well as protecting their eyes)
BUT it will be far more comfortable.
The glasses issue I’m not sure how to solve other that the tips people are putting online.
To get a tight seal you will need one of the industrial masks that Steve mentioned that are used by woodworkers, concrete sanders, panel beaters, etc .... even then they are not fool proof.
Luckily our fabric shops are open - Aust Post is overwhelmed so online ordering is near to useless here.
But look to your wardrobe & linen press for fabric.... an old pair of denim jeans? A cotton blouse or skirt that doesn’t fit? Old Tshirts? Pillow cases & sheets? Tartan scraps?
I’ll find some links for you all that may help.
Quick Edit:
The shirring and any elastic to go over the ears, along with washing, drying will shrink the elastic and fabrics
I’ve been washing mine in the machine cold wash with sanitiser and air drying then a hot iron.
Last edited by Lady Grey; 28th April 20 at 05:56 PM.
-
The Following User Says 'Aye' to Lady Grey For This Useful Post:
-
28th April 20, 06:22 PM
#19
Links that may be useful
Shirring elastic
http://www.blogforbettersewing.com/2...-part-two.html
She links to videos that show it as well
I personally dont like the type she uses I think its too thin. Its more like knitting-in elastic you would use for socks.
I prefer the Gutterman
Fabric to use & studies
https://www.nytimes.com/article/coro...-mask-ppe.html
https://maskfaq.com/
https://www.armytimes.com/news/your-...-found-so-far/
https://www.researchgate.net/publica...uenza_Pandemic
Ive found this method using hair ties instead of elastic really comfortable
https://www.sewcanshe.com/blog/elast...-<br />
masks
I have an idea I might test out with elastic zig zagged over the nose and Ill see how that goes.
-
The Following 2 Users say 'Aye' to Lady Grey For This Useful Post:
-
29th April 20, 12:17 PM
#20
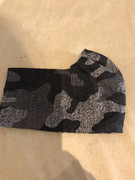
I made another one, and this only took me 6 hours. Not quite as perfect a job on the tartan stripe matching in the under-chin dart area, but oh well.
The first one I made must have been 11 or 13 oz tartan material, because it was much lighter, thinner, and easier to breathe through. This second one has to be 16 oz material. There's a very noticeable difference in weight, thickness, and breathability. I didn't think it would make much difference in the end, but it does. This one may be better suited for winter, assuming this virus makes a comeback in the next wintry season.
Oh, and I added a wire piece over the nose using a pipe cleaner. All it does is add bulk, and it's not stiff enough to hold the shape over my nose. Lesson learned.
I ordered some elastic material, so hopefully when that shows up I can replace the bootlaces with short elastic ear-loop pieces.
 
Last edited by Tobus; 29th April 20 at 12:18 PM.
-
The Following 5 Users say 'Aye' to Tobus For This Useful Post:
 Posting Permissions
- You may not post new threads
- You may not post replies
- You may not post attachments
- You may not edit your posts
-
Forum Rules
|
|


Bookmarks