|
-
Help Removing an Invisible Stitched Hem
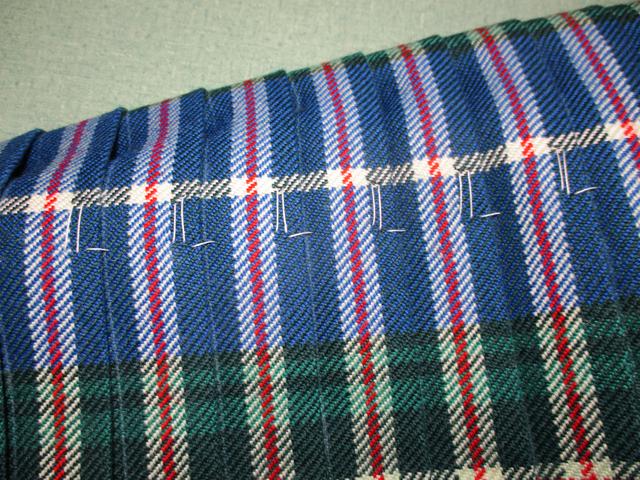
I recently bought a kilt that had been hemmed using an invisible stitched that set the length from 24" down to around 22". I was told that the selvage edge still in original condition and was never cut when they altered Kilt to make shorter, it was simply folded & stitched.
Under normal circumstances, I would either be reaching out to one of our sponsors or the local tailor (who does the kilts for a number of the bands in my area) about "fixing" this issue, but given the current climate we are in, I'm wondering if this is something that I might be able to fix/undo fairly easily myself.
So, for someone with virtually no seamstress experience under my belt, I am curious if people would suggest that I could do this myself, or advise that I just hold off and let a professional do it.
I would also like advice on, once I remove the stitches holding up the hem, do I just steam out the crease?
Thank you all in advance for your help, and understanding my level (or lack thereof) of kilt modification.
Rob
-
-
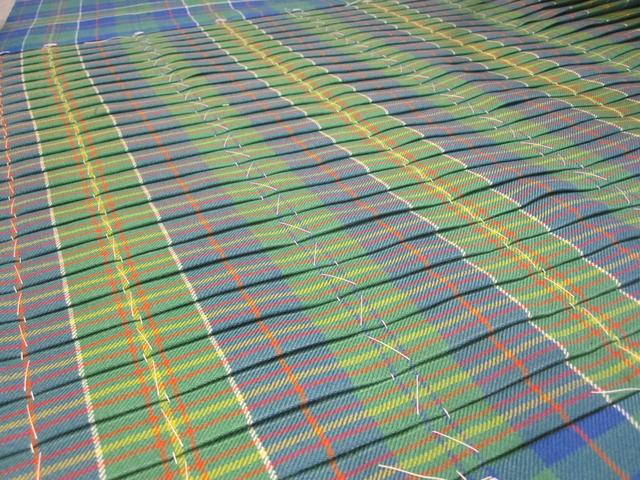
Could we see a picture please.
-
-
 Originally Posted by figheadair

Could we see a picture please.
Including a closeup - as close as you can get it, please.
Rev'd Father Bill White: Retired Parish Priest & Elementary Headmaster. Lover of God, dogs, most people, joy, tradition, humour & clarity. Legion Padre, theologian, teacher, philosopher, linguist, encourager of hearts & souls & a firm believer in dignity, decency, & duty. A proud Canadian Sinclair.
-
-
And please include a close up of each apron facing so we can see how the fabric is folded.
Please include the small turned up areas at the other side of the apron so we can see how that was done too.
Steve Ashton
www.freedomkilts.com
Skype (webcam enabled) thewizardofbc
I wear the kilt because: Swish + Swagger = Swoon.
-
-
-
-
-
The Following User Says 'Aye' to Bad Monkey For This Useful Post:
-
OK. super easy. That is a machine sewn blind hem.
Basically a chain stitch.
So cut one of the threads at one end. If you got the right end all the stitching should just pull out.
If it does not un-ravel, try the other end.
Then set up a steam iron set to the Wool setting. Get a pillow case and a spray bottle full of water.
Put the cloth on the inside of the fabric and spritz liberally with water. Well damp but not wet.
When you put the iron on the pillow case the heat will heat the water to steam that softens the fibers.
Don't worry about trying to keep the pleat creases right now, just try to steam the hem flat and if you lose the bottom couple of inches of the pleat crease don't worry you will be pressing them right back in later.
The pillow case prevents the hot iron sole plate from damaging the wool. The water creates steam to soften the wool fibers. And all the iron does is create heat and allow you to put pressure on the fabric to flatten the creases.
Go slow and give the fabric time to heat up. It should be hot enough that you cannot keep your hand on the fabric for more than a few seconds. The secret is the steam which does all the work.
When the hem is totally gone, baste the pleats and the apron edges back into place and press them down - HARD -. This sets the creases back in the pleats and where the hem was creased in the opposite direction.
Please don't skip the basting. Its job is to hold everything aligned as you move the kilt around and you can press over basting without leaving the puckers that pins leave.
Last edited by The Wizard of BC; 19th May 20 at 02:29 PM.
Steve Ashton
www.freedomkilts.com
Skype (webcam enabled) thewizardofbc
I wear the kilt because: Swish + Swagger = Swoon.
-
The Following 4 Users say 'Aye' to The Wizard of BC For This Useful Post:
-
Originally Posted by Bad Monkey
Nova Scotia?
You are correct Bad Monkey - my curling club has developed a close relationship with a few of the clubs up in Nova Scotia, that has turned into an annual friendly either there or in New York, as well as a number of side trips by members to visit one another.
That, plus I bagpipe, and can always use new and interesting kilts for the various events I play at.
Rob
-
-
Originally Posted by The Wizard of BC
OK. super easy. That is a machine sewn blind hem.
Basically a chain stitch.
So cut one of the threads at one end. If you got the right end all the stitching should just pull out.
If it does not un-ravel, try the other end.
Then set up a steam iron set to the Wool setting. Get a pillow case and a spray bottle full of water.
Put the cloth on the inside of the fabric and spritz liberally with water. Well damp but not wet.
When you put the iron on the pillow case the heat will heat the water to steam that softens the fibers.
Don't worry about trying to keep the pleat creases right now, just try to steam the hem flat and if you lose the bottom couple of inches of the pleat crease don't worry you will be pressing them right back in later.
The pillow case prevents the hot iron sole plate from damaging the wool. The water creates steam to soften the wool fibers. And all the iron does is create heat and allow you to put pressure on the fabric to flatten the creases.
Go slow and give the fabric time to heat up. It should be hot enough that you cannot keep your hand on the fabric for more than a few seconds. The secret is the steam which does all the work.
When the hem is totally gone, baste the pleats and the apron edges back into place and press them down - HARD -. This sets the creases back in the pleats and where the hem was creased in the opposite direction.
Please don't skip the basting. Its job is to hold everything aligned as you move the kilt around and you can press over basting without leaving the puckers that pins leave.
OK, thank you. One of my main concerns was that "reversing the creases on the pleats" was going to be more difficult than I expected, but it sounds like it may not be.
I have basted and ironed pleats before to refresh them, and it sounds like this is going to be a more arduous version of that. I have not basted before, but I know I have seen instructions on the forum before. I know that my tailor bastes before they clean my kilts, which was an important variable in selecting them..... I guess it is my turn to learn what I have been putting this poor guy through!
Thank you, Wiz.
Rob
-
-
19th May 20, 04:01 PM
#10
-
The Following 4 Users say 'Aye' to The Wizard of BC For This Useful Post:
 Posting Permissions
- You may not post new threads
- You may not post replies
- You may not post attachments
- You may not edit your posts
-
Forum Rules
|
|


Bookmarks