X Marks the Scot - An on-line community of kilt wearers.
|
-
16th October 21, 09:21 AM
#1
Paper Rulers And Studying The Sett
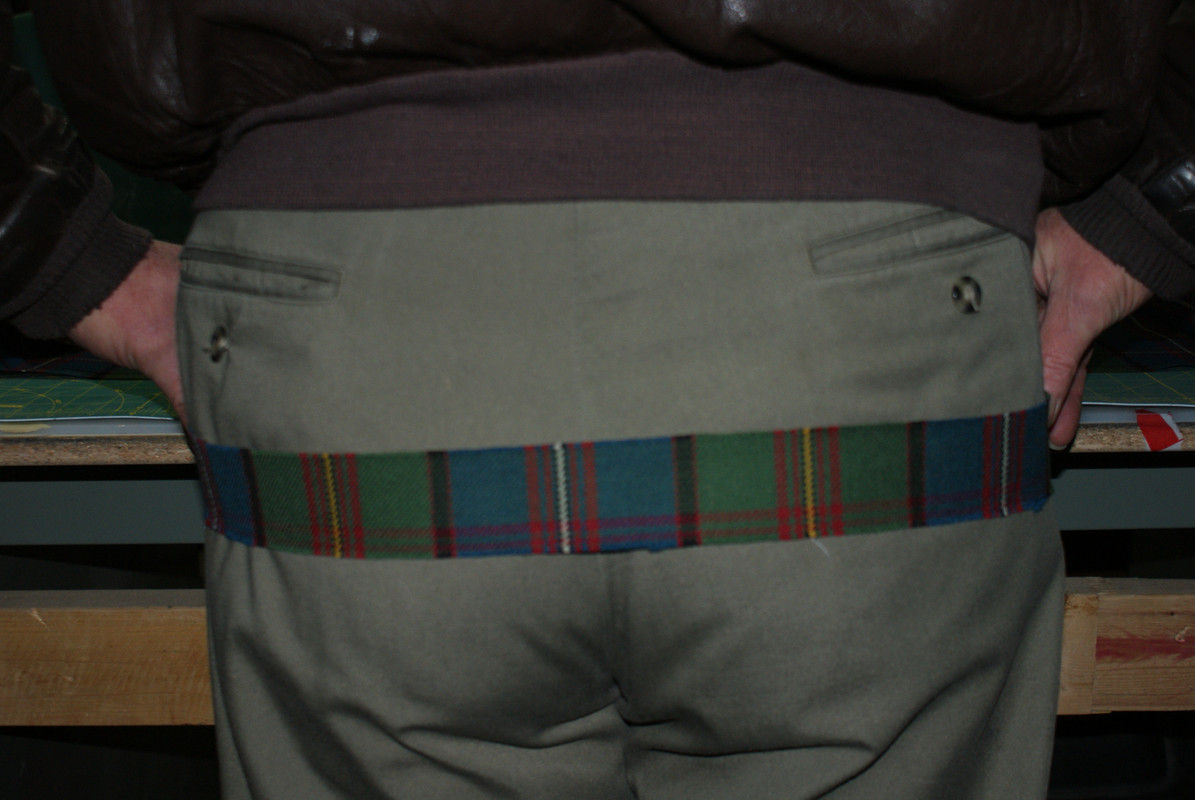
Faithfully following Barb and Elsie's guidance in TAoK, I arrived at the point where I needed to make pleat decisions. I'm pleating to the sett, not the stripe and working with MacKay Modern from HOE with a sett width of 8.75".
I tried using a normal ruler, but had trouble visualizing where I wanted my pleats. It's not a complex tartan, I'm just that new to this.
What I found worked was to take a simple image of a ruler from the web, stack a number of copies together then print them landscape mode and to scale on one piece of paper. I cut each ruler into a separate strip, then prominently marked each with different pleat widths using a black marker. This made the pleat divisions jump out at me and it became obvious which width to choose and where they would sit across the tartan.
For my tartan, it looks like 7/8" is the magic number.
-
-
16th October 21, 10:20 AM
#2
If may offer an alternative method. This is how I teach it and is the method used in THCCK. The principal behind this method is the classic High School Geometry lesson - How to divide any length line into any number of equally spaced divisions.
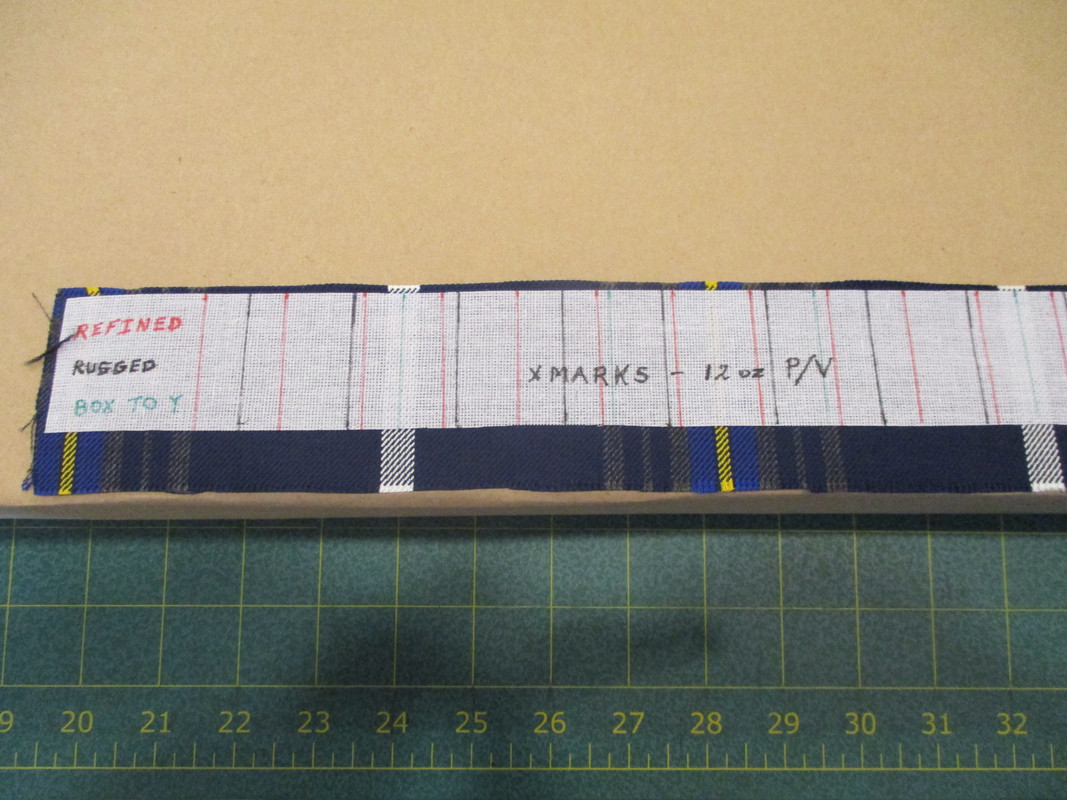
1) Cut a length of fabric from your center strip long enough to go around your backside with your choice of front apron center element centered in the strip.
2) To stabilize the Tartan strip and provide an easy writing surface, iron on a piece of iron-on waistband interfacing.
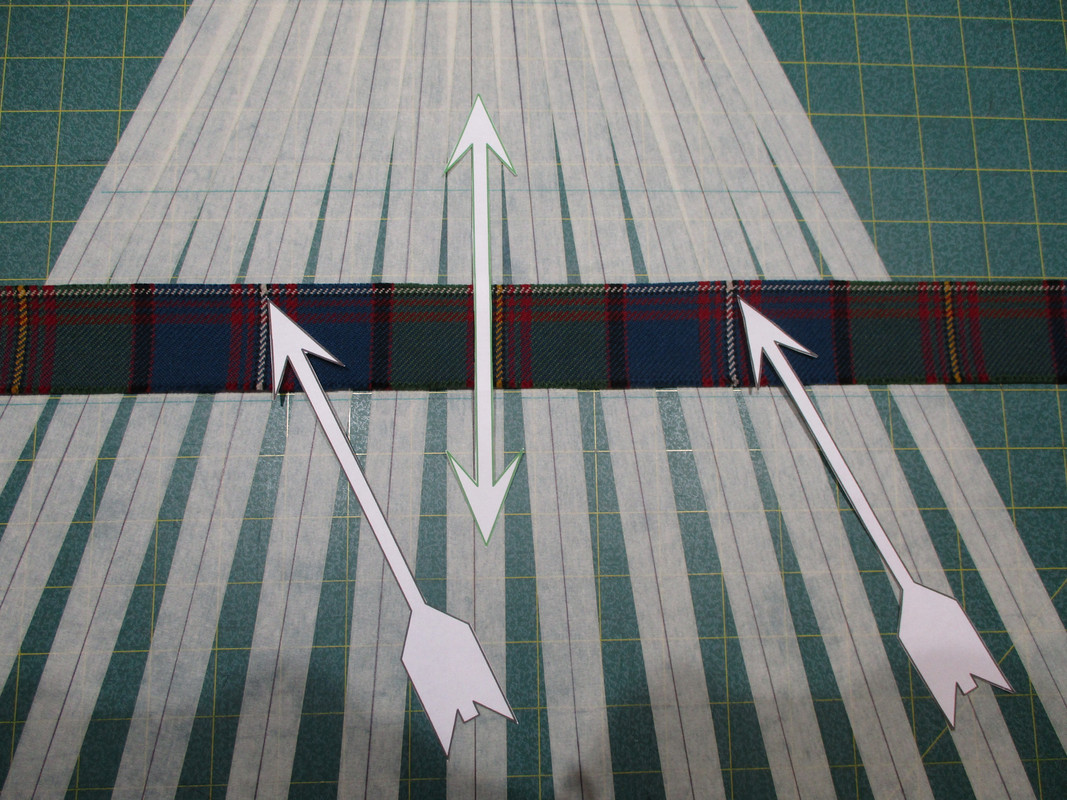
3) On your lay-out table construct a "magic starburst". A series of lines beginning at a single point, radiating out to any number of equally spaced divisions. How many lines you draw and the spacing at the bottom will depend on the size of your lay-out table. Using masking tape makes the starburst easier to see and also allows it to be temporary, one-time-use.
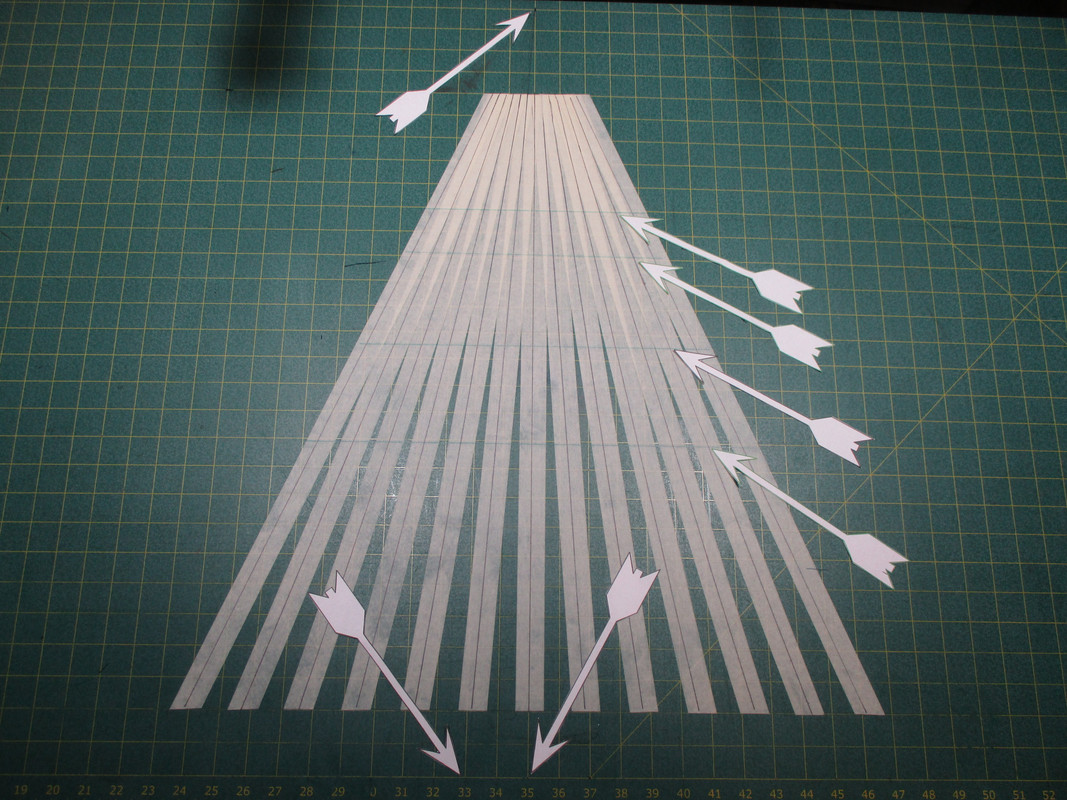
4) Lay your Tartan strip on the lines of the starburst. Keep the Tartan strip horizontal and temporarily center your front apron center element between any two lines. (Green Arrow)
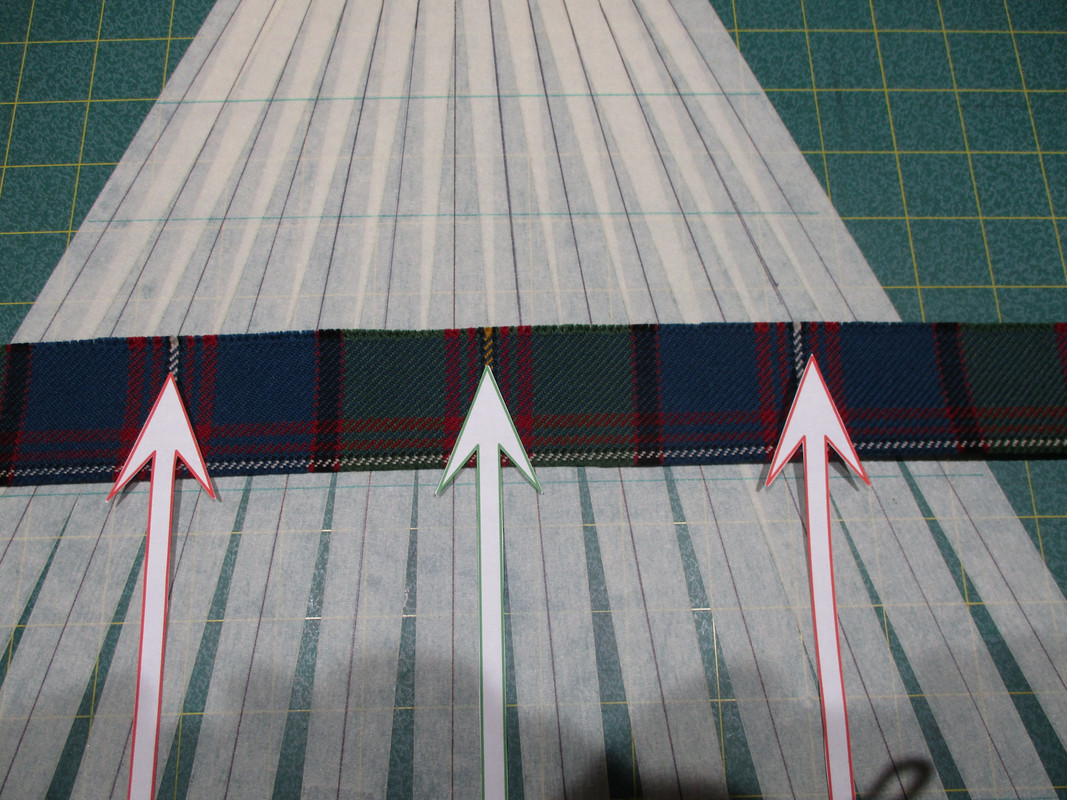
5) Slowly move the Tartan strip vertically up and down until any two pivot points are on any two starburst lines. This will divide your Tartan Sett into a number of equally spaced divisions. At this point don't worry about how many divisions. Draw a line on your table at this height so you can measure the width between lines easily.
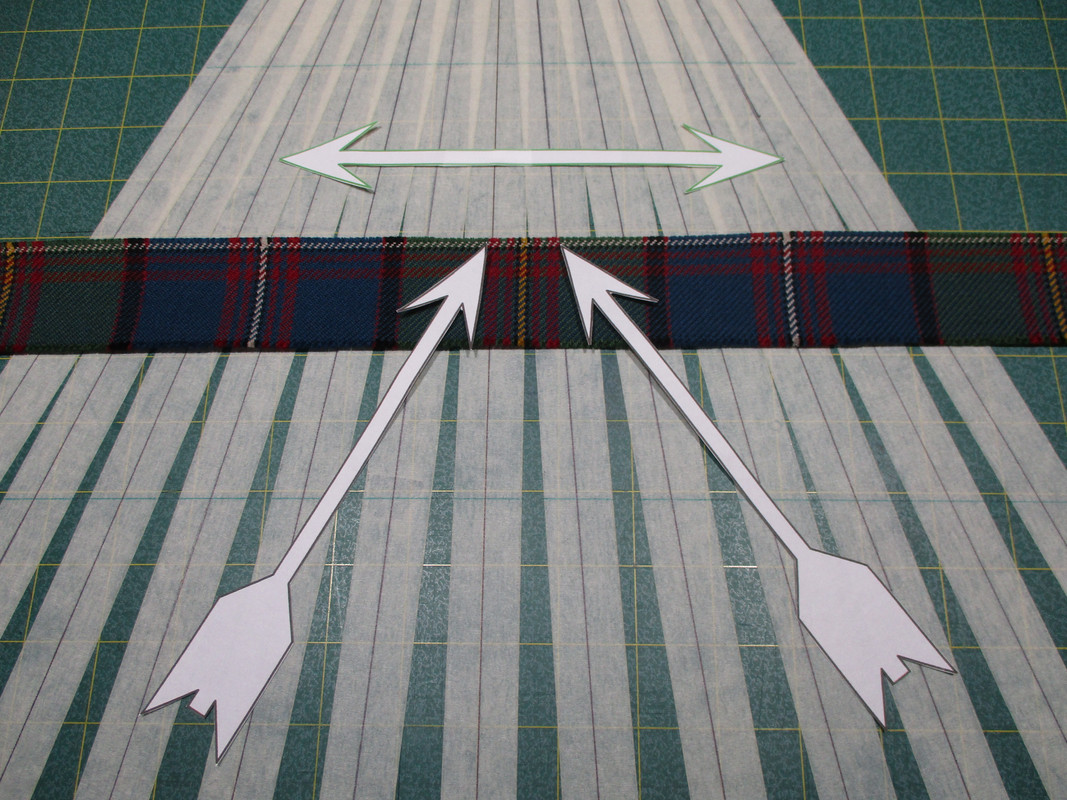
6) The previous step is nicknamed "The Up/Down". This next step is nicknamed "The Side to Side". It determines if the width of the divisions between lines is suitable for your Tartan Sett.
The concept is to evenly divide the Tartan pattern with lines. Pay close attention to where lines fall within the Tartan pattern and how the Fell Taper will effect the look of the Sett.
7) It is quite common on the first attempt at "Up/Down" "Side to Side" for the width between lines to be too wide or too narrow.
Simply repeat the "Up/Down" to the next place on the Starburst where the Sett Lines up. Moving the Tartan strip up increases the number of divisions per Sett. Moving the Tartan Strip down, decreases the number of divisions per Sett.
Once you have found a place on the starburst that has a pleat width that you like (approx. 5/8" to 1") and the lines fall in good parts of your Tartan pattern (A pleat crease will not split a Tartan element or cause a Sett element to disappear when you Taper the Fell Area) Mark your iron-on waistband interfacing.

8) It is now a very simple thing to lay your Tartan strip right on your kilt fabric and mark the pleats according to the marks on the strip.
This is the method of laying out pleats that was developed by me at Freedom Kilts. It was used successfully for almost 20 years.
In those years I never ran across a Tartan that this method did not work with. (I suspect that there is one, I just never ran across it)
Yes, this method may seem a bit finicky at first but once you try it, it becomes very clear and very, very quick. It is also a very accurate way to lay-out pleating to Sett. You can visualize all the pleats right on the Tartan strip.
Last edited by Steve Ashton; 16th October 21 at 11:57 AM.
-
The Following 2 Users say 'Aye' to Steve Ashton For This Useful Post:
-
16th October 21, 10:27 AM
#3
Oh, that's clever, Steve.
Thanks for that. If I were doing more than just these two kilts, I would definitely adopt your system.
We'll see how these go and whether I transition to serial kilter.
-
 Posting Permissions
- You may not post new threads
- You may not post replies
- You may not post attachments
- You may not edit your posts
-
Forum Rules
|
|


Bookmarks