|
-
9th January 12, 11:15 AM
#41
Re: Two DIY tweed kilt jacket conversions
Any pictures of the jacket done yet ? just wondering ? I am  to to
see it done and on . Thanks
Pro 3:5 Trust in the LORD with all thine heart; and lean not unto thine own understanding.
-
-
9th January 12, 11:22 AM
#42
Re: Two DIY tweed kilt jacket conversions
I ordered pewter buttons from Dirk and Thistle last week.
Should have them sometime late this week if they had them in stock, and should have pics week after next.
..I've been busier building sgian dubh blades!
I had the gray tweed off the hanger and almost started on cutting it to length Saturday, but metalwork beckoned more loudly!!
-
-
9th January 12, 11:35 AM
#43
Re: Two DIY tweed kilt jacket conversions
I understand ,I have tryed to start on a Coversion of my own and every time
something ,has to come first . Great work on the blades .
Pro 3:5 Trust in the LORD with all thine heart; and lean not unto thine own understanding.
-
-
9th January 12, 04:44 PM
#44
Re: Two DIY tweed kilt jacket conversions
You did prompt me to chop off the bottom of the gray jacket at lunch time. 
I believe it needs the Argyll/bucket cuffs, too.
Braemar/flap cuffs would be a nice option so I've got two styles in my closet....but I liked the challenge of sewing the Argyll ones. 
-
-
10th January 12, 04:53 AM
#45
Re: Two DIY tweed kilt jacket conversions
Yes the cuffs , make a big differance ,I did not think so at first , and I made one out of a wool blazer ,and now I want to go back and add cuffs.
I think I need more of the same material now to do so ,But maybe I will do the next one that way.
Good luck with the project ,hope to see it. 
Pro 3:5 Trust in the LORD with all thine heart; and lean not unto thine own understanding.
-
-
10th January 12, 08:42 AM
#46
Re: Two DIY tweed kilt jacket conversions
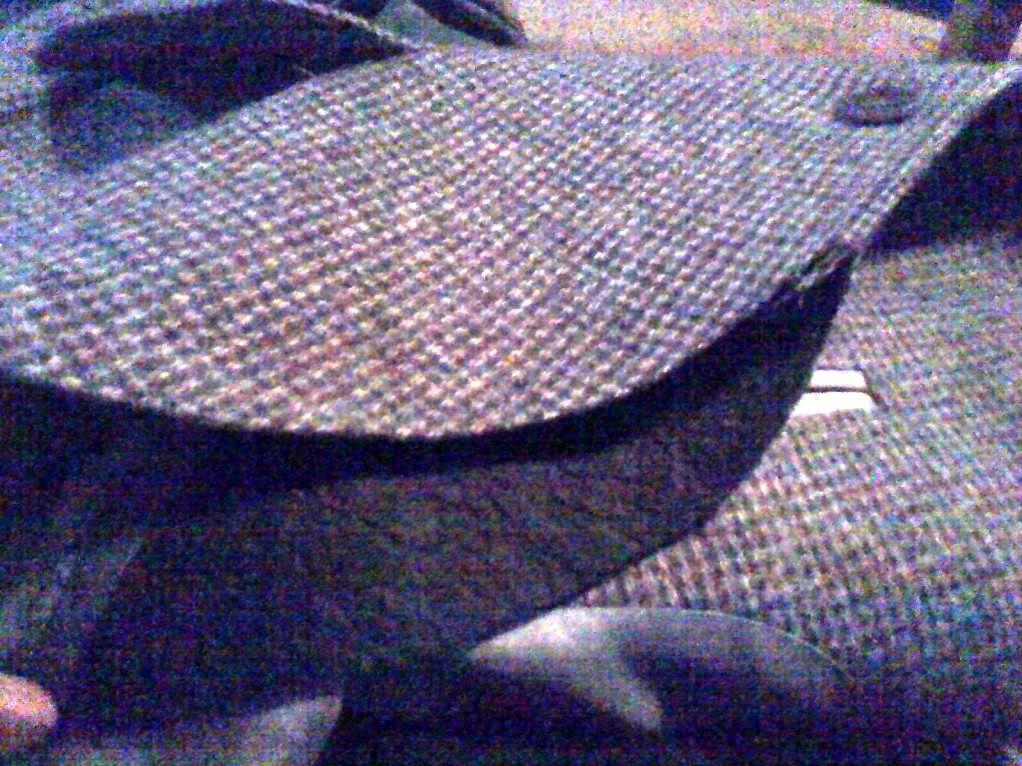
Progress on the gray jacket:
Cut the bottom off.
Pardon the crappy cell phone pics. I left my camera at work, and I couldn't not document my progress!
The back had a center vent. I basted it shut to get the tweed aligned on both sides, then machine-stitched from the back for strength.

Pressed the seam flat, then trimmed the excess width.


Hand-stitched the lining closed

I then pressed a fold at the bottom of the back about 1" wide.
Put the jacket on, and it looked like the back rose up a bit, so I reduced that fold in the center to about 3/4" so it would hang lower/more level.
Here's a pic of the sporran cutaway. The fold will go right through the former lower buttonhole.
-
-
10th January 12, 08:52 AM
#47
Re: Two DIY tweed kilt jacket conversions
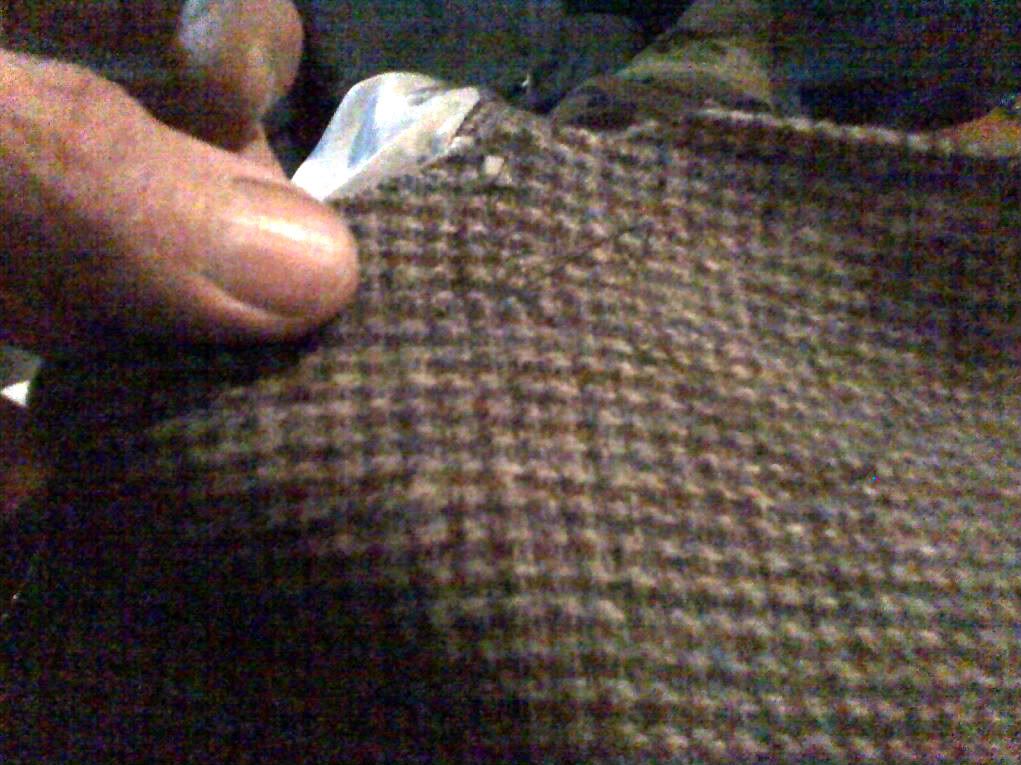
Closing a buttonhole:

I like to "baseball stitch" a slit like this. If I whipstitched it, tightening the thread could cause the edges to pass each other and both make a pucker in the fabric and a thick spot. Besides, the tweed pattern would no longer line up.
Instead of stitching from the top of one side and up through the bottom of the other, stitch up from the bottom on one side and back down through the slit. Stitch up through the other side and back down through the slit. The thread makes a figure-8 instead of a circle. When I pull the thread tight, the edges of the fabric are butted together, but can't ride up past the thread from the other side and makes a nice, tight, clean seam:


-
-
10th January 12, 08:53 AM
#48
 Re: Two DIY tweed kilt jacket conversions Re: Two DIY tweed kilt jacket conversions
Looking good !!
? The cut out - so that is just for the sporran right ? so is there a pattern
to the curve or a basic template to make the curve?
Or is it just the designner's own liking ? I like the way you made yours !
But I see so many different shapes of curve -some longer then others.
What is your take on that ?
Pro 3:5 Trust in the LORD with all thine heart; and lean not unto thine own understanding.
-
-
10th January 12, 09:25 AM
#49
Re: Two DIY tweed kilt jacket conversions
 Originally Posted by Thomas H

Yes the cuffs , make a big differance ,I did not think so at first , and I made one out of a wool blazer ,and now I want to go back and add cuffs.
I think so, too!!
Originally Posted by Thomas H
? The cut out - so that is just for the sporran right ? so is there a pattern
to the curve or a basic template to make the curve?
I looked a lot at the thread that McMurdo posted of HRH the Duke of Rothesay. I really like the cut of a lot of his jackets.
The green tweed had a fairly small radius at the bottom, a nearly straight line up to the buttonhole, then a medium radius at the buttonhole. The buttonhole radius made somewhat of a "corner" that looks amateurish to me.
This one somewhat follows Alan H's directions (I think it was AlanH. I just searched to embed the link and couldn't find it. It had some pretty fine measurements and radii calculated). I didn't do all the math or make a pattern, but I sketched it until it looked good to my eye. Again, small radius at the bottom, very, very large radius through the cutaway to a medium radius at the button hole. The buttonholes were slightly higher on this jacket than the green one, so I had a bit more room below the upper buttonhole.
It also helped immensely that I turned the bottom of the jacket inside-out and machine sewed the front to the facing along that radius. I was able to start at the original edge stitching, so the new cutaway flows smoothly down from the original jacket edge.
There's a bright red sport coat at Salvation Army. It's far too bright to think of being a jacket, but would make a great waistcoat...and I could cut up the sleeves to make a pile of garter flashes!!!
-
-
10th January 12, 09:28 AM
#50
Re: Two DIY tweed kilt jacket conversions
Let's do something fun with the pocket.
We're going to make a scalloped flap without removing the flap from the body of the jacket.
Remove the old patch pocket:

Remove any topstitching from lower corner to lower corner.
DO NOT REMOVE ANY EDGE (HIDDEN) STITCHING!!!
Fold the flap in half and stick a pin in the fold. This marks the point in the center of the pocket.
Fold the flap from each side to the center pin. Stick a pin in each fold. This quarter point marks the deepest part of the scallop.
With 3-5 tight whipstitches, baste right at the center pin:

Baste at each lower corner with 3-5 tight whipstitches:

Snip about 3/8" deep through the edge at each quarter-point pin.

Here's where the cool part starts:
With your finger, poke the edge up inside the flap itself.
A small mouth will form of that snip we made in the previous step as the scallop forms:

The inside seam allowance will try to roll upon itself. You need to massage it into place so it lies flat against the back of the face fabric.

Once you get everything inside laying flat, pin it in place and press:

You don't need to press it hard at this stage, but the steam will relax the seam allowance that was giving us a hassle in the previous step. If you're not happy with the shape of the scallop at this step, pull your pins and reshape it. It will be easier the 2nd try because of relaxing that seam allowance.
Deep press and blind stitch the edge of the pocket to the lining.

The magic is that by leaving the original edge stitching intact, by worrying about the face scallop into place, the lining automagically follows it and it's a scallop, too.
Re-topstitch and you're done.
-
Similar Threads
-
By jhockin in forum DIY Showroom
Replies: 9
Last Post: 14th December 11, 04:37 PM
-
By JamieKerr in forum DIY Showroom
Replies: 11
Last Post: 26th February 08, 11:05 PM
-
By Uncle Al in forum General Kilt Talk
Replies: 8
Last Post: 31st January 08, 08:03 AM
-
By Packhound in forum DIY Showroom
Replies: 10
Last Post: 15th September 07, 08:19 AM
-
By Panache in forum How to Accessorize your Kilt
Replies: 13
Last Post: 22nd May 06, 01:44 PM
Tags for this Thread
 Posting Permissions
- You may not post new threads
- You may not post replies
- You may not post attachments
- You may not edit your posts
-
Forum Rules
|
|


Bookmarks