|
-
10th September 12, 02:48 PM
#11
 Originally Posted by AKScott

I suppose you can buy brass discs somewhere too, I haven't looked.
Lowes has brass washers and I would imagine most hardware stores would have some available. Would these work?
-
-
10th September 12, 06:01 PM
#12
Originally Posted by Friday
Lowes has brass washers and I would imagine most hardware stores would have some available. Would these work?
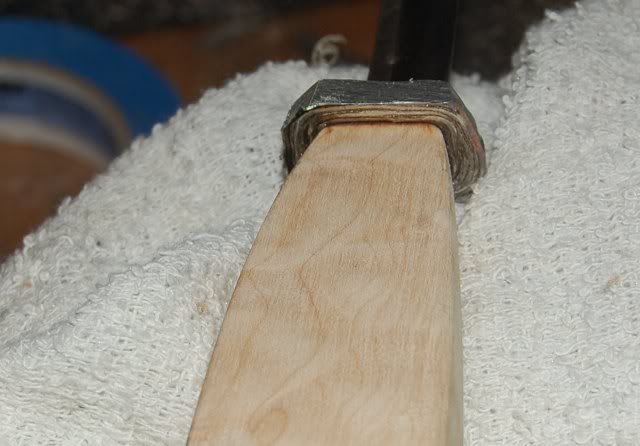
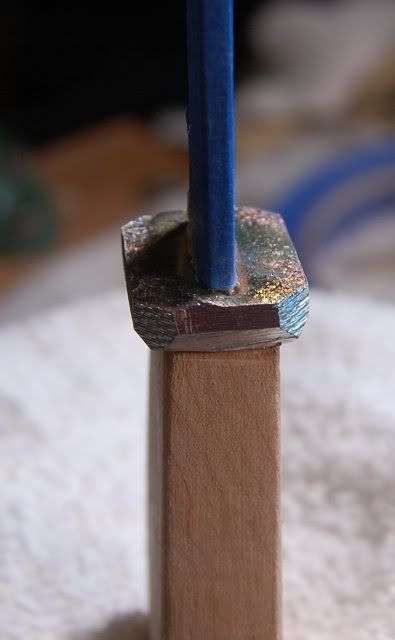
They might could. Notice two out of three pictures in post three, the cross section of the tang is rectangular.
So you (I) would want a washer with enough of an outside diameter to cover all the handle end, but a small enough inside diameter opening that no handle end would show through the finished piece.
Another option would be to buy a ferrule or guard along with the blade when ordering off the internet. It would be sort of like a washer, only with a rectangular hole in the middle.
I'll go dig up one of my top ten favorite quotes I read in a book of all time here directly. briefly, you are limited only by your creativity.
EDIT: found it:
Originally Posted by ADNewell
Guide to gunstock finishing and Care, A. Donald Newell, (c. 1949)
Chapter one: Do not think you are limited by what you have to work with. You are limited only insofar as you allow your intelligence and reasoning to do that limiting. Accept a narrow horizon and your work will reflect that thought, but by realization of the vast possibilities open to you your scope of operations will be broadened and your work will reflect that freedom of thought and action.
Last edited by AKScott; 10th September 12 at 06:11 PM.
-
-
10th September 12, 06:15 PM
#13
Originally Posted by AKScott
EDIT: found it:
Originally Posted by ADNewell
Guide to gunstock finishing and Care, A. Donald Newell, (c. 1949)
Chapter one: Do not think you are limited by what you have to work with. You are limited only insofar as you allow your intelligence and reasoning to do that limiting. Accept a narrow horizon and your work will reflect that thought, but by realization of the vast possibilities open to you your scope of operations will be broadened and your work will reflect that freedom of thought and action.
This is one of the reasons my wife doesn't like me to go for a drive before the garbage is picked up. I am constantly finding new toys.
-
-
10th September 12, 09:00 PM
#14
I have to go find the Hallelujah chorus, I think I have it mis-filed under the Christmas music.
As I learned to say when I was knee high to a bug, I am in tall cotton now. All that is left to do is file off the excess metal from the pour - without scratching up the wood or the blade- and bang out a sheath
-
-
11th September 12, 10:13 PM
#15
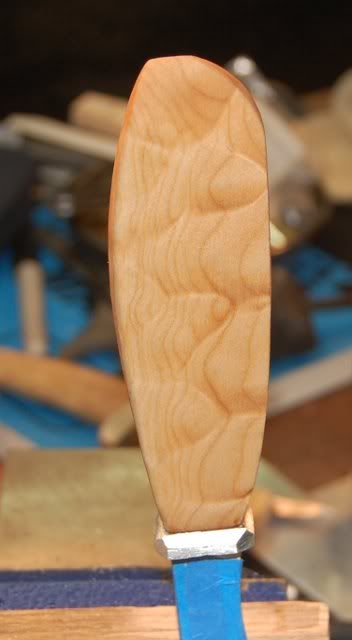
Hoping to get a coat of finish on the wood later tonight.
I got the metal shaped:
And the final sanding on the wood. Here it is damp with water. As soon as it is dry I'll shave off the fibers that lift up with some fine steel wool and get going on the wood finish. Planning to wet mold a sheath tomorrow night.
-
-
11th September 12, 10:42 PM
#16
Originally Posted by AKScott
Hoping to get a coat of finish on the wood later tonight.
I got the metal shaped:
And the final sanding on the wood. Here it is damp with water. As soon as it is dry I'll shave off the fibers that lift up with some fine steel wool and get going on the wood finish. Planning to wet mold a sheath tomorrow night.
Sweet !! Beautiful woodgrain ! What do you envision as the final finish ?
Mike Montgomery
Clan Montgomery Society , International
-
-
12th September 12, 08:40 AM
#17
Originally Posted by MacGumerait
Sweet !! Beautiful woodgrain ! What do you envision as the final finish ?
I am using the Birchwood-Casey gun stock oil that I had tried on a scrap in post 5, put the second coat on this morning. I would have liked to have used a tiny little bit of stain to darken it up just a touch, but the end grain sucked up, gosh, at least three times as much stain as the face grain. It just looked wrong.
I have read (not sure) that the product I am using is more or less boiled linseed oil, but with enough dryes in it to make a hard finish rather than one that stays damp for decades. Don't know.
-
-
12th September 12, 10:19 AM
#18
It's not Tru-Oil, is it? That stuff is actually a synthetic polymerized finish, not a traditional oil (despite the misleading name). It makes for a good durable finish, but it works much differently than a natural oil like BLO or tung oil.
-
-
13th September 12, 10:01 PM
#19
Originally Posted by Tobus
It's not Tru-Oil, is it? That stuff is actually a synthetic polymerized finish, not a traditional oil (despite the misleading name). It makes for a good durable finish, but it works much differently than a natural oil like BLO or tung oil.
It is indeed tru-oil. Whatever it is all of my face grain, endgrain and side grain is about the same color, but the dry stuff doesn't feel sticky on my skin. I guess we'll see in the fullness of time how it works out...
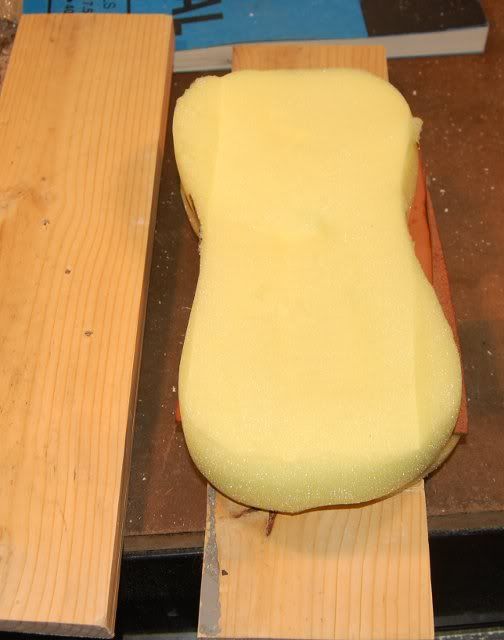
last night I wet formed the sheath, but didn't take any pictures. So tonight I opened it up for a preliminary look see. I left the "sandwich in my vise overnight, and it has a few days of drying still to do so I put it back...
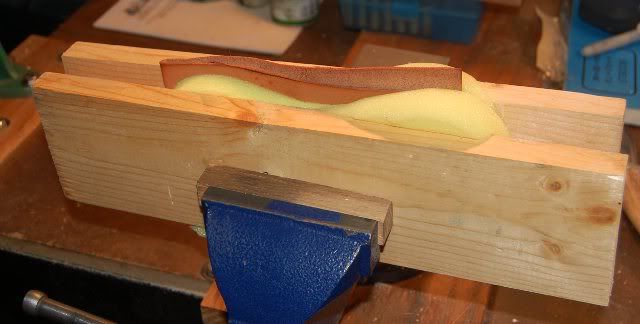
Out of the vise with the top piece of wood turned back, you see yelllow synthetic sponge. Not real ocean grown sponge with silica spicules in it, synthetic foam sponge to distribute the pressure of the vise spread through the wood down into the nooks and crannies of the next layer...
Which is the wet formed leather...

And clamshelled open, my current knife sheath looks like this:

So I have a thing this weekend anyway, and the leather is going to take a few days to dry. I'll plan to open this back up on tuesday, but I can offer a few comments that go with building the sandwich in the first place.
First, the blue tape on the blade in the last picture is holding down a pair of cutouts shaped exactly like the blade. The cutouts are of pasteboard, the sort of thick paper found on the back of pads of paper. A few mm thick, but not corrugated cardboard. The goal is to make that part of the sheath a little tiny bit bigger than the blade, so the blade doesn't usually touch the leather, pick up acids and get discolored.
Also visible is a triple to quadruple wrap of Saran wrap, clear plastic sticky food wrap to keep water off my knife. Sp that part is easy.
Now on to the leather. This is my fourth wet formed sheath. For the first one I dropped a chunk of room temperature leather into boiling water and I have never made that mistake a gain. Too hot for me to handle.
What I do now is immerse a piece of leather into room temperature water, and then turn on the heat. Within 1000 vertical feet of sea level, when you see a layer of fine bubbles spread evenly on the floor of the pot, your water is close enough to 155°F to turn the heat off. Now wait a few minutes for the leather to finish heating. All we need to do is get the leather hot enough for the collagen fibers to soften or plasticize. We don't need to "cook" the leather, just plasitcize the collagen. Plan on about 10% shrinkage, watch for the leather piece to kind of wrinkle up and darken, more or less evenly.
Your knife should already be wrapped in plastic wrap when you light the stove.
Working quickly with your piping hot piece of leather position it on your work surface, get your knife centered on it, fold the leather and start massaging it to the shape you want. As soon as you are pretty close, build the sandwich, get it clamped in a vise and let it dry. For this one I worked it hot less than a minute, I am thinking five days or so for drying.
Once the leather is pretty well dried out I will poke holes in it, stitch the clamshell shut and trim off the excess, in whatever order makes sense when I get around to it.
I am very happy that I seem to have a really really good impression of the bolster on both sides of the sheath. I am confident I can file the bolster down a tiny bit so that the knife is well retained but not impossible to draw. I fear I may need to sew a backing piece of leather onto the sheath so it doesn't bite my leg. I'll cross that bridge when I get to it.
Last edited by AKScott; 13th September 12 at 10:03 PM.
-
-
14th September 12, 10:30 AM
#20
Your description of wet-forming the leather is interesting. I've never known anyone to use heat in this process. I've wet-formed all manner of knife sheathes, gunstock wraps, and watched my wife build saddles, canteen covers, etc., all using cold water. I don't see why the heat would be necessary to the process. As long as the leather soaks sufficiently, it will stretch and form to the surface.
As long as the end result is what you want, though, that's all that matters!
-
 Posting Permissions
- You may not post new threads
- You may not post replies
- You may not post attachments
- You may not edit your posts
-
Forum Rules
|
|


Bookmarks