|
-
15th June 10, 01:42 PM
#1
That is beautiful leather. Few things are as pretty as fine wood and fine leather.
It even appears to be a good match for my sporran strap! 
Jim Killman
Writer, Philosopher, Teacher of English and Math, Soldier of Fortune, Bon Vivant, Heart Transplant Recipient, Knight of St. Andrew (among other knighthoods)
Freedom is not free, but the US Marine Corps will pay most of your share.
-
-
15th June 10, 03:56 PM
#2
-
-
16th June 10, 05:29 PM
#3
No pictures this time, but a bit of a bloggy update.
Working out the pattern for the petal folds is a major P.I.T.A! I just finished attempt #3 right now and am setting up for attempt 4. It's a gather, so the outer edge of the pattern gets pulled in toward the eventual edge of the front face. At the same time, I'm going to have to seriously skive the back of the leather to make the gather not be too lumpy under the central targe.
They will also need to be stitched in place (I won't trust JUST gluing) to maintain shape under the targe. The spacing, depth and distance on these folds is really frustrating me.
As I said before in another DIY thread, THAT'S the problem with minimal detailing, everything has to be perfect, otherwise it looks like (*$^%& 
NOW I know why hunting sporrans have the stitched down petals or tassels rather than HRH's folded decoration! 
I will now end rant and return you to your regularly scheduled web browsing.
-
-
16th June 10, 06:44 PM
#4
I was wondering how you were going to do the gathers...hope it works out OK. Looking forward to seeing the finished product.
Laurie
The secret of happiness is freedom,
and the secret of freedom, courage
Thucydides
-
-
16th June 10, 11:15 PM
#5
I have ever confidence you'll suss it out.
[SIZE="2"][FONT="Georgia"][COLOR="DarkGreen"][B][I]T. E. ("TERRY") HOLMES[/I][/B][/COLOR][/FONT][/SIZE]
[SIZE="1"][FONT="Georgia"][COLOR="DarkGreen"][B][I]proud descendant of the McReynolds/MacRanalds of Ulster & Keppoch, Somerled & Robert the Bruce.[/SIZE]
[SIZE="1"]"Ah, here comes the Bold Highlander. No @rse in his breeks but too proud to tug his forelock..." Rob Roy (1995)[/I][/B][/COLOR][/FONT][/SIZE]
-
-
17th June 10, 01:52 PM
#6
Looking very well planned out so far, and even though you're going well beyond my preferences, I salute another hunting sporran maker!  If you need any advice with the construction, let me know, and I'd be glad to help in any way I can. Also would be interested in picking up a bit of that hide, if you have any to spare. Haven't used pull-up in anything yet, and I've actually been avoiding it out of concern for how it might get 'dinged up.' If you need any advice with the construction, let me know, and I'd be glad to help in any way I can. Also would be interested in picking up a bit of that hide, if you have any to spare. Haven't used pull-up in anything yet, and I've actually been avoiding it out of concern for how it might get 'dinged up.' 
Oddment in Residence
-
-
18th June 10, 07:26 AM
#7
GOOOOOOD Morning!
I've been up since 0400 local BBQing some pulled pork for my dad for Father's Day. Since manning the grill only takes 10 minutes per hour, I've been spending most of the rest of that time working on these cursed petal folds.
After two more alterations to the paper patterns from the other day, I started in on leather.
The pieces I'm using are some old scrap I had, and not as thick as the new hide, but I'm going to have to skive some of the back off anyway to get it down to a foldable thickness and to make sure the targe doesn't stand off the face of the sporran.
Of course, the nature of leather, with it's thickness and 'give' tend to mess things up a bit, so I've done this twice... and I'm getting pretty close.
With one more adjustment to the raw size of the piece and a slight increase in the width of the fold (as well as some final shaping), I think we'll be right.
Once these few changes have been made and finalized, I'll cut a final pattern for this, both flat for the cut, and with a raised 'folding aid' to make sure both size and placement of the petal folds is consistent.
The rest of the pieces are essentially finalized in paper form and waiting to be given a last 'test-fitting' in leather before I start cutting up the good hide.
BTW: Thanks all for the continued encouragement and kind words.
-
-
18th June 10, 08:01 AM
#8
This is so tantalizing to watch. I am learning a lot.
If you need any advice . . . don't call me because I'm just an observer.
Keep those cards and letters coming.
Jim Killman
Writer, Philosopher, Teacher of English and Math, Soldier of Fortune, Bon Vivant, Heart Transplant Recipient, Knight of St. Andrew (among other knighthoods)
Freedom is not free, but the US Marine Corps will pay most of your share.
-
-
18th June 10, 03:25 PM
#9
Absolutely beautiful work. I'm amazed that you're making such progress on what will be a gorgeous sporran.
-
-
19th June 10, 06:37 AM
#10
Well, my work yesterday was slowed down by having to tend to the grill more than I planned (storm front changed all the weather, rain on grill cooled my perfect 225*f to 195* - had to rebuild heat) Ended up wet, muddy, covered in coal dust and ash. However, at 2059hrs, just 17hrs after my start time, I finally got everything off the coals and pulled the pork!
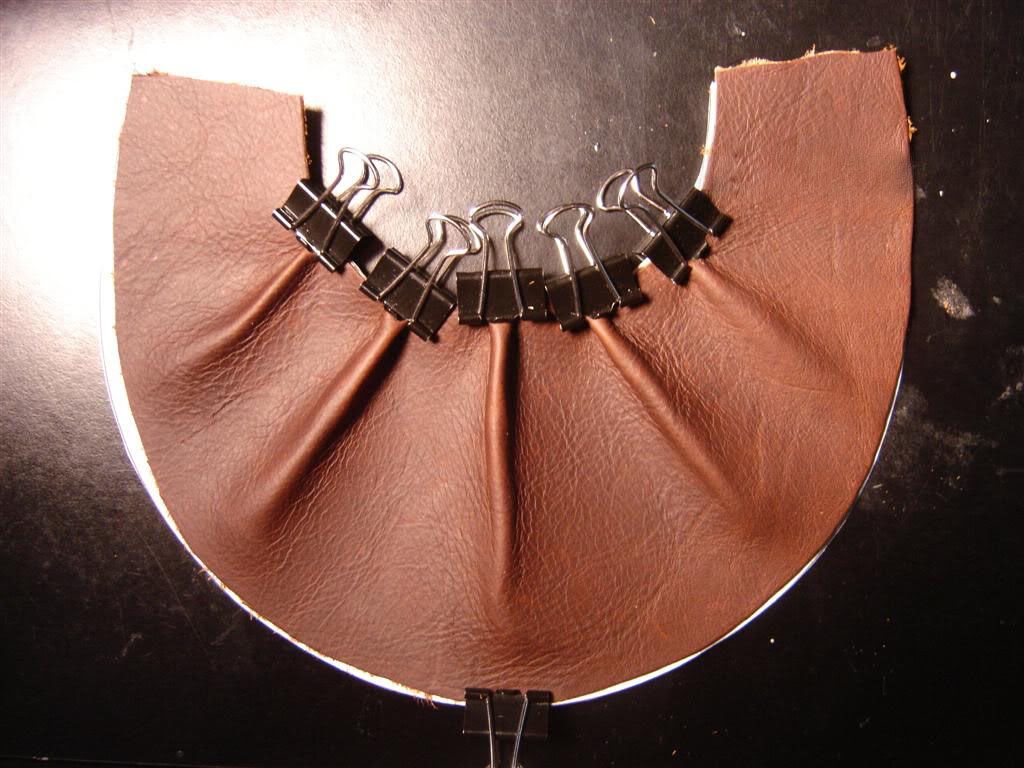
Luckily, I still had time to get test pieces for the major parts of the front cut. These are still cut from scrap leather and will need a bit of tweaking. Ignore the size difference between the top and bottom of the bag, the top pieces were cut to represent the edge of the stitching and fold over for the 'purse lip' and aren't quite the full size. I'm trying to focus on the proportions on the front panel here.
I don't have the full hole pattern for the top 'collar' above the targe finished to my liking, so only the bottom row is punched.
Also, the stitched detail that joins each section together is obviously absent here.
The lower section of the bag shown here is basically the one from yesterday, the new one is still being adjusted/skived.
Luckily, my pinker (sawtooth edge cutter) seems to be just the perfect size for this application. On the inner targe the circumference is such that I don't have to cheat any of the peaks 
Without further ado - test fit 1
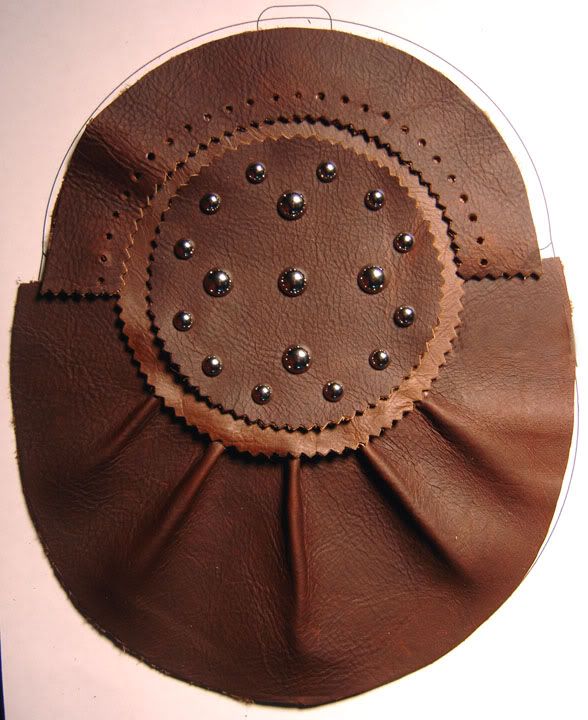
I may make a change and remove the inner part of the central targe, and have the edge that is now pinked be a simple saddle stitch. I don't know if I'm that thrilled with the additional layer here. I added it in after making the original design, and I think it might be too busy. Below is an altered image to show (with the colour change) where the stitch would lie, but I've removed the pinked edge in Photoshop.
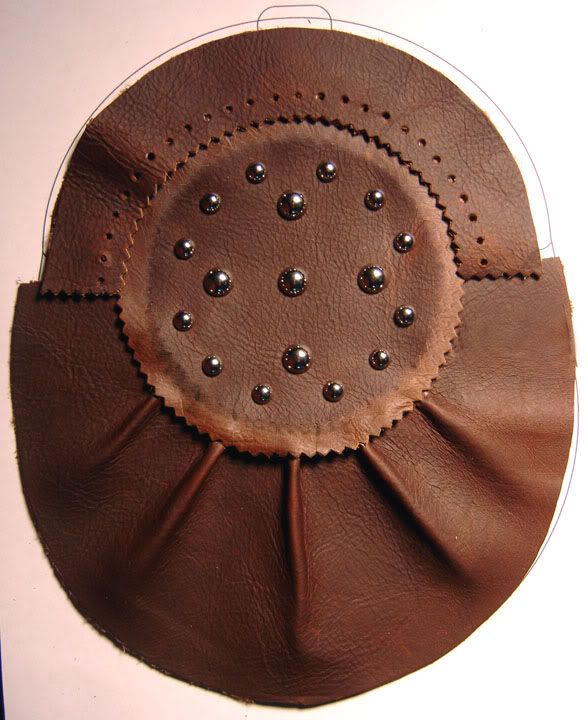
This one feels more balanced to me.
Any thoughts?
EDIT: After staring at the images, I realized I really needed to actually physically model the more simple targe design.
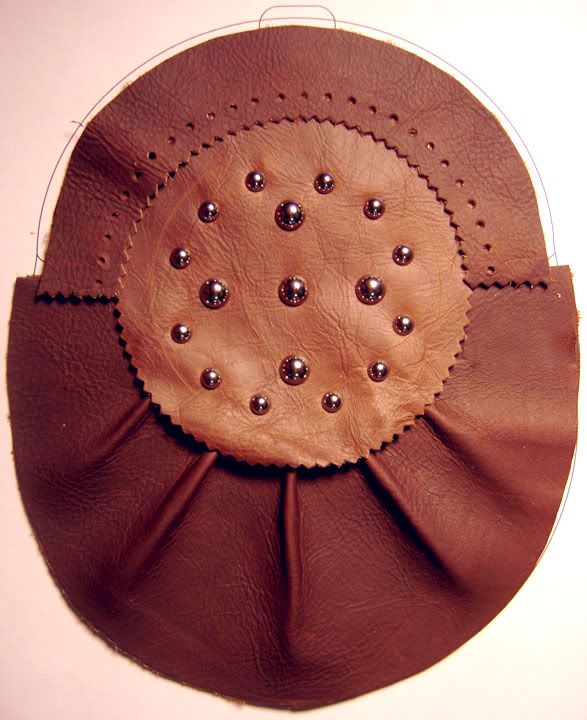
I think with the targe padded on the area inside the ring of stitches this will provide enough visual interest and depth. This will 'puff up' slightly the central area providing a more three dimensional face and 'relief' like on the double stacked targe. The padding will either be felted wool or a special pad material made for this purpose.
I've scribed in the first two stitch lines as well, one on the targe (though this WILL be moved outward toward the pinked edge by 3/32"~) and the first stitch line on the upper collar (this will most likely be brought slightly inward toward the first row of perforations by
about the same distance - I did these by hand without my good compass scribe)
Last edited by artificer; 19th June 10 at 07:56 AM.
Reason: Continued Revision
-
Similar Threads
-
By CMcG in forum How to Accessorize your Kilt
Replies: 10
Last Post: 4th June 10, 10:46 AM
-
By Dall_Piobaire in forum How to Accessorize your Kilt
Replies: 11
Last Post: 28th June 09, 12:14 PM
-
By KiltedSurveyor in forum DIY Showroom
Replies: 19
Last Post: 7th May 09, 03:50 AM
-
By Joe Gondek in forum DIY Showroom
Replies: 14
Last Post: 20th August 08, 02:20 AM
 Posting Permissions
- You may not post new threads
- You may not post replies
- You may not post attachments
- You may not edit your posts
-
Forum Rules
|
|


Bookmarks