|
-
28th March 09, 04:20 PM
#1
X-kilt plus....
Plus what? Plus pockets, that's what. I'm planning four (two rear welted patch pockets, two front, inside a pleat pockets). I've done only the first rear one as yet.
Step one. Make most of an X-kilt according to Alan_H's instructions. Proceed to the point where you're ready to attach the waistband, basically.
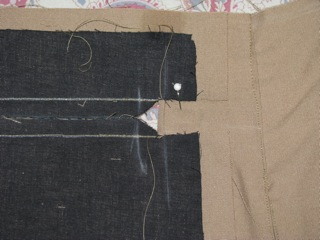
Step two. try the kilt on, pin it right, and get someone else to mark where the pocket should be
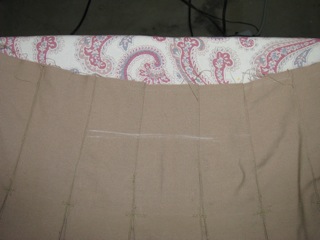
I'm making pockets with a six inch cut. That's the same size as my Utilikilt has, and seems about right. Note that I've made an error on placement: this line is two high. It's 2 1/8" from the top, and it's the center of a 3/4" cut, so the top of the pocket is just 1 3/4" from the waist band. I think they really need to be half or 3/4" lower than that. Also note that the line my helper marked isn't actually staight. That's okay: my waistband makes a suitable reference, and I'll measure from that for this next step, marking the ends of the cut line:
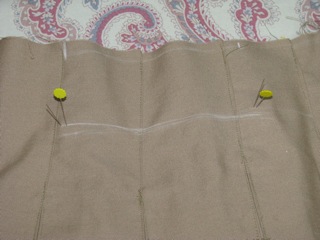
I stuck a pin from the top through, just inside of where I want the end to be. Then I stuck a pin from the back side at exactly where I wanted the end to be. Took a couple tries to get it exactly right.
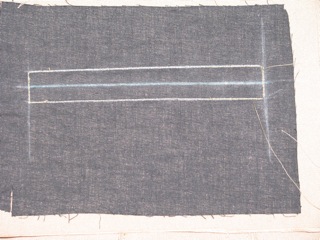
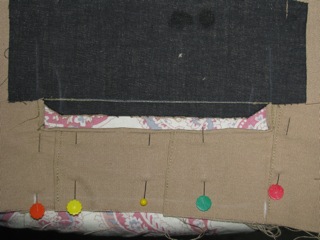
Next I prepared the patch. I used a patch that's 9 inches wide by 6 tall. You need one that's at least two inches wider than your cut: one on each side. You need a couple inches of height, on each bottom and top. Top should be long enough that the top will be at the waistband. bottom should be about three inches, but don't go past the fell line. The extra thickness will effect the hang. Then I put interfacing on the wrong side of the patch. I used a fusible non-woven piece that was available.

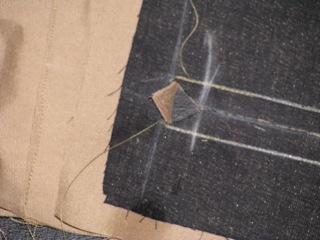
Then we mark the patch with what will be the top and bottom welts of the pocket. I went for 3/4" wide, which is pretty typical for welted pockets. I marked those lines, the vertical stop lines, and a line halfway between the two welt lines, which is the cut line. Then the patch goes on to the kilt, right sides facing each other. The pins that I have sticking through the kilt were used to make sure I got the patch in just the right spot:

They don't show up well in that picture, but they exactly go through the intersection of the cut line and the vertical stop lines. It took a number of finger prickings to get that right. Then, I thoroughly pin the patch to the kilt:

pins are placed so that they don't have to be removed to stitch on the lines.
Stitch exactly on each stitching line: the top welt line, the bottom welt line, and the two side welts. It's important to get stitches exactly in the right place, parallel, and not past each other. Back stitch away from the corner, at least half an inch. Make sure these stitches are perfect. If they're not square, you won't be able to make the pocket opening shaped right, and you'll have a saggy or wavy or buckled pocket. The next step is to slash a hole in your kilt, and you can't go back from there, so make sure these stiches are exactly right.
(you can't see the stiches, but they're there, and they're right. I ripped one out to redo it.)
Now, I cut out on the cut line. Make a vertical line 1/2" inside the edge stiches, one on each side. Using a very sharp razor or exacto knife, or something like that, make a short slash along the middle of the cut line. Then using very sharp, heavy duty shears (you're cutting through 6 to 10 layers of fabric) cut from the center slash to the vertical lines you just made. Cut from where you stop to each corner, coming as close as you possibly can to corner stitching, but dont' cut the stitching! So you're cutting out a line that's shaped like >----<
Now it's time to turn the patch through the hole forming the welts. I do the sides first, then the top, then the bottom. For the sides, you need to cut the patch, from the edge to very near the edge stitching, along a continuation of the top and bottom stiching lines. Make very sure you only cut the patch, and not the kilt! Then you fold the little rectangle you cut and the triangle piece in the cutout area back around, making the side welt. It should be about 1/8" inch wide, but even is much more important than exact size. Pin it in place, trying to get the pin through the triangle bit. (you need very sharp pins to go through that much fabric). Take the kilt to the pressing table, and press that welt in. Then stitch it in place, from the right side of the kilt. Stitch "in the ditch", right next to the folded bit. You'll also need to stitch down the rest of the rectangle. Because of where my pleats are, I could stich it the inside of a pleat, so there's no visible line of stitching.
Do the same thing for the other side welt.
For the top welt, I cut out most of the flap of fabric that's in the cut out area. I wanted a small top welt, and it's impossible to fold that many layers up. Cut evenly, and very carefully. Fold the top part of the patch through the hole, form a nice even welt, pull the sides taut, and pin it in place. Then press, and sew it in the ditch. You probably want to turn the corner, and go halfway down each side.
The bottom welt is slightly different: instead of being a narrow piece of fabric, it's tall enough so there's no gap between the top and bottom. So fold the bottom piece through (no need to trim), make the tall welt, pull it nice and smooth, and even, and pin it in place. Make sure there's no gap. Press it, stich it in the ditch. Again, you want to turn the corners and sew half way up the sides.
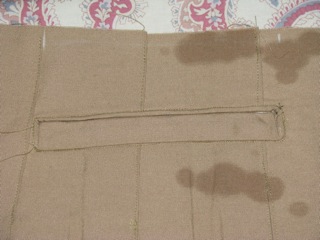
That's the outside of the pocket done.
the lining is much easier, though it involves some twisting and pushing to get it through the sewing machine. I used a single piece of cotton pocket lining material, 9 inches wide. that's 1 1/2 inches wider on each side, than the pocket cutout is; part is folded along the edges, to keep the raw edge of the fabric inside the pocket seam. To hang well, kilt pockets need to be very deep, so I simply used half my 45" wide pocket lining. That gives a depth of about 10", which should be enough. the selvedge end is attached to the wrong side of the bottom pocket patch, so that the patch is what you see inside the pocket. The fabric goes down the 10" or so, is folded on top of itself, up to the top of the top part of the patch, and down the wrong side of the top patch. That's hard to describe, but easy to do. I'm not allowed to put any more pictures in this post, so I'll do another showing that part.
-
Tags for this Thread
 Posting Permissions
- You may not post new threads
- You may not post replies
- You may not post attachments
- You may not edit your posts
-
Forum Rules
|
|


Bookmarks